Im not sure if I've ever mentioned it here, but last October I got a random email from a publisher from about.com in the nursery/kid portion of the site. I thought it was some kind of mistake when I first saw it on my inbox. Kathryn said she saw our blog on the sneak peek of our nursery and was drawn to it. So she emailed our business email, luckily we had a link to our business website on the blog. She said she couldnt find an email address to contact me so she searched around the links and was happy to have found our website. At first we were apprehensive about sharing our story with her because we werent sure if she was real or not. So, after mentioning it to John that day, we did a little research on her. She's a nice lady and patient at that. We were suppose to get the full interview and pictures done and sent to her after Thanksgiving. Well, life happens and we didnt get a chance to completely finish it by the first deadline. Before we knew it, Tristan was born and life after that was just too chaotic, especially with family flying in and out for a good 6 weeks. We took the nursery pictures back in December, but we never got a chance to sit and edit them til the end of January. We finally sent her the finished interview along with the photos just 2 weeks ago. Yikes! A whole 5 months later! She was very nice about it and understood because she had kids of her own.
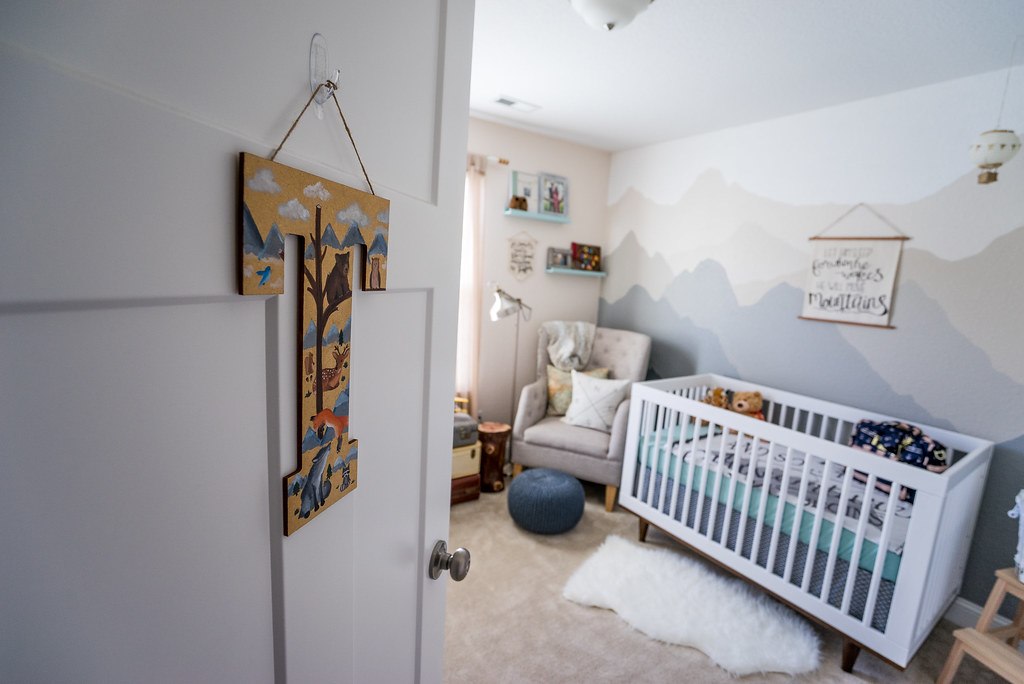
We have been wanting to blog the full nursery reveal for a while but wanted to wait 'til Kathryn got the article out 'cuz we promised we'd let her feature it first! So, here it is! We certainly put a lot of thought and creativity into his nursery and we are more than happy with the turn out. A lot of it didn't go according to plan, but we love how everything fell into place at the end.
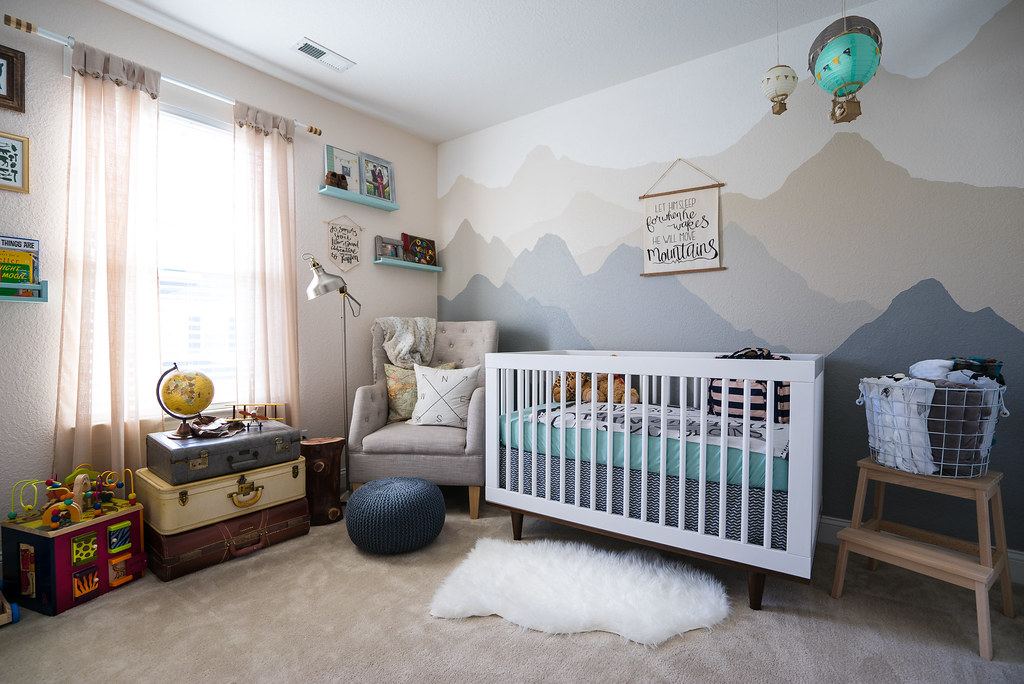
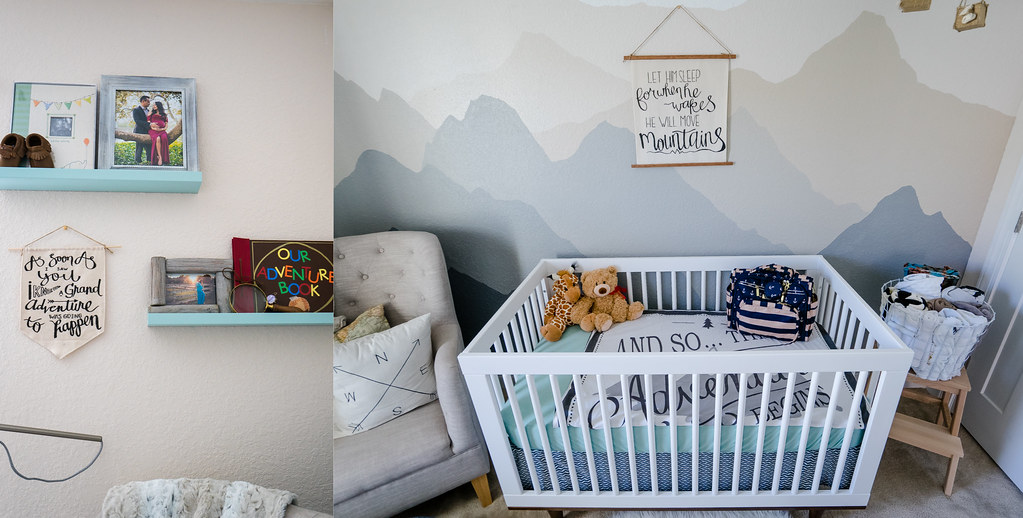
Theme: Adventure/Travel/Woodlands
Color: Neutrals (Cream, Grays, Whites) with a hint of Turquoise Blue (his birth stone).
The theme was a given already. Before we even found out we were pregnant, we already knew we were gonna center it around adventure and travel. I even incorporated some things from one of our favorite animated movies: UP! My birth announcement to John was even adventure related (watch the reveal here!) The day I told John we were expecting, one of the firs things he did after the news sunk in was go on Pinterest to pull up inspirations. I already had a hidden board full of ideas. Well, the bad thing about that is we didnt know where to start. We still ended up with a blank drawing board. We threw ideas at each other and agreed on a lot of things, but we also disagreed on some. It was to the point where we no longer looked at our Pinterest boards and just let it flow as the months went by.
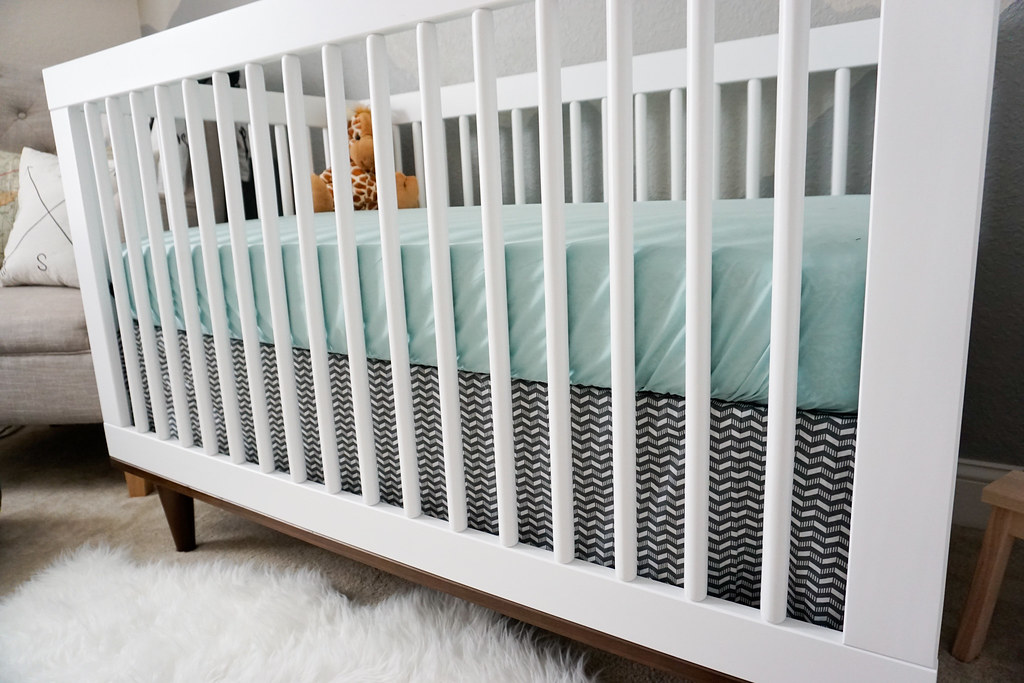
Why did we choose neutral instead of gender color specific? Well, we wanted to keep it clean and simple. We didnt want his entire room to be painted blue just because he's a boy! With this, we figured it'd be a nice space he can grow in to. Its also easy to change out accent colors. We wanted to keep his furnitures white with a mix of rustic and wood to stick to the outdoorsy/woodland part of the theme.
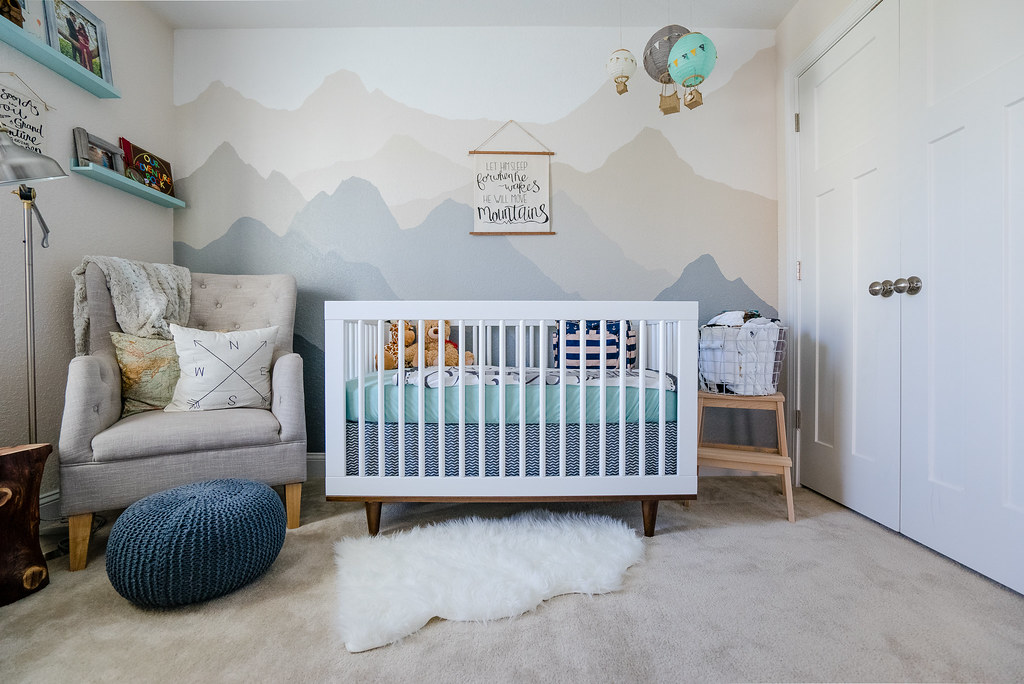
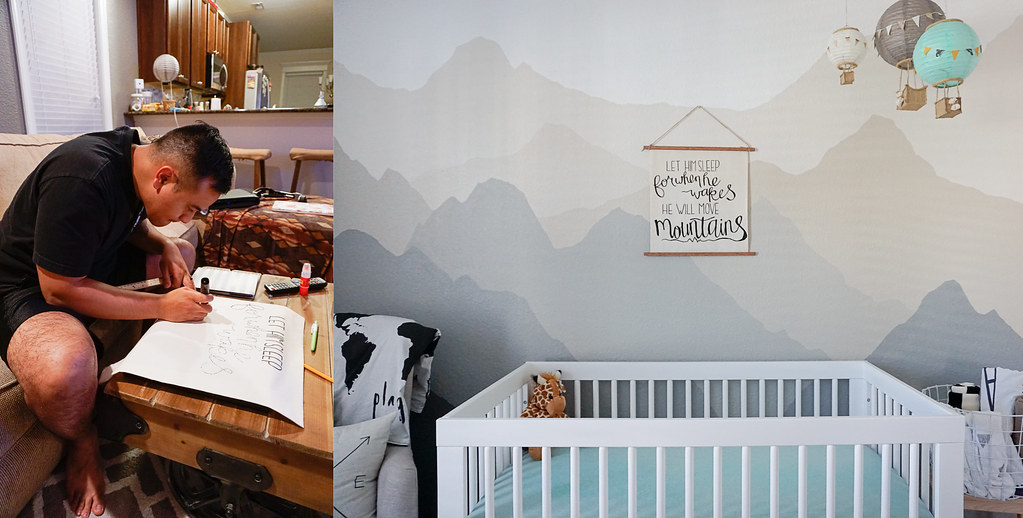
John got the mural inspiration after our trip to Sutro Baths/Lands End and he noticed the mountain silhouettes in the background on one of the images he took from the trip. That is his favorite thing in the nursery. A lot of things are DIY-ed, thrifted then repurposed, or something we already had. Other things were bought from Homegoods, Ikea, or Amazon. We set a budget for this nursery and waned to make sure we stuck to it. We were fortunate enough to have had my parents offer to buy the crib and mattress! You can find some of the diy stuff we did under the Projects/DIY tab on top of the page!
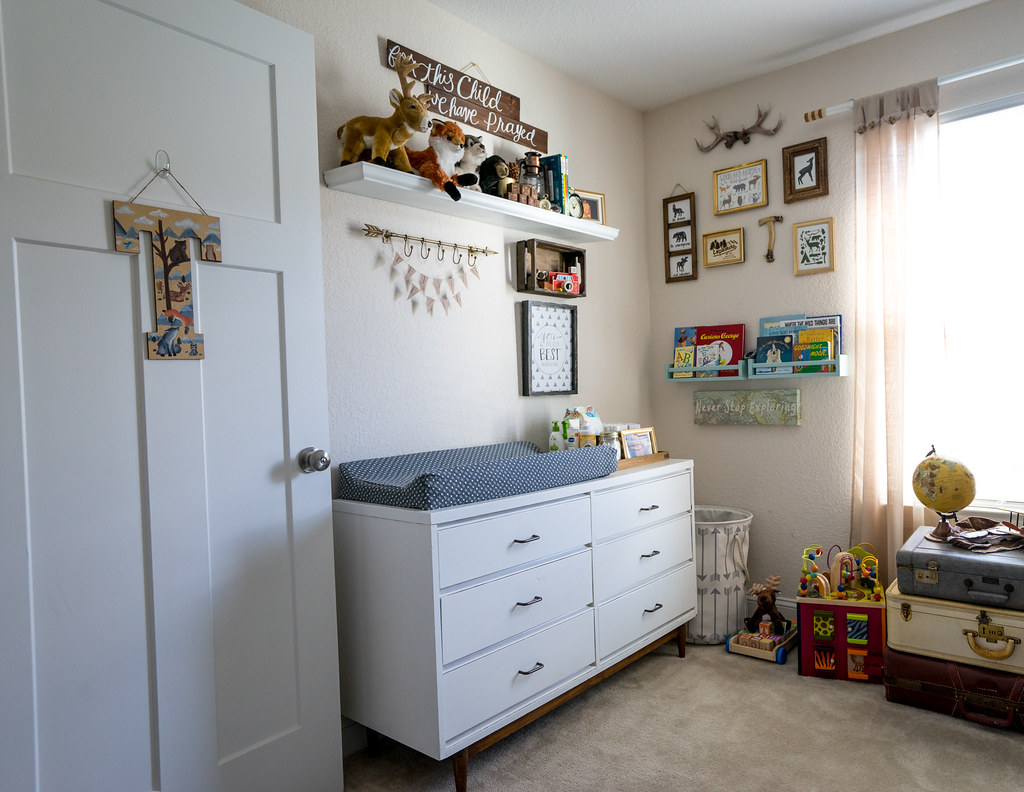
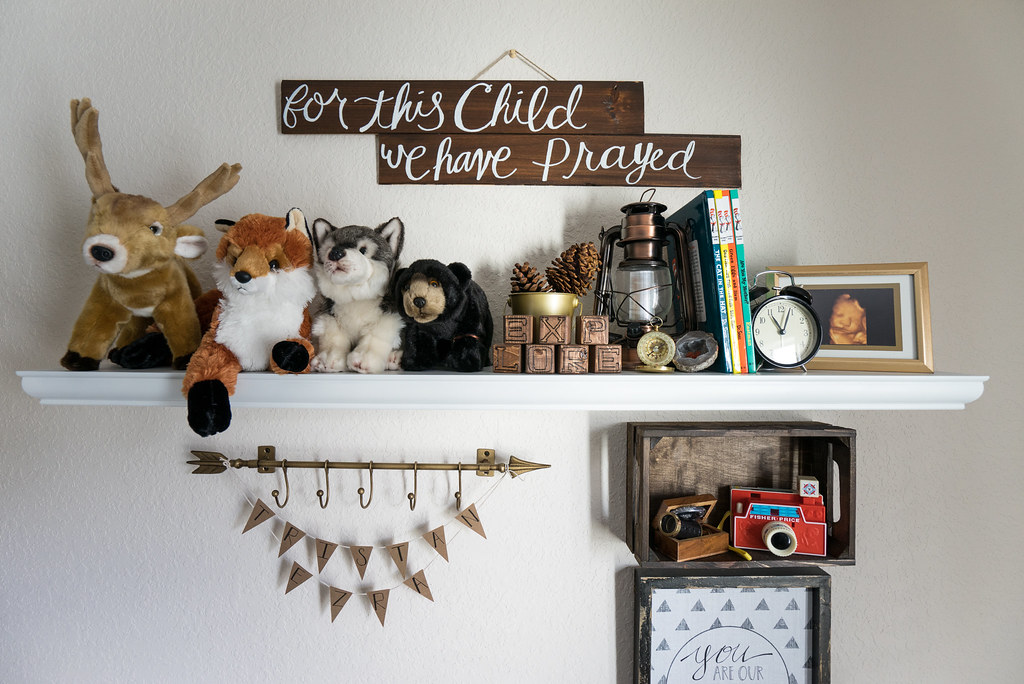

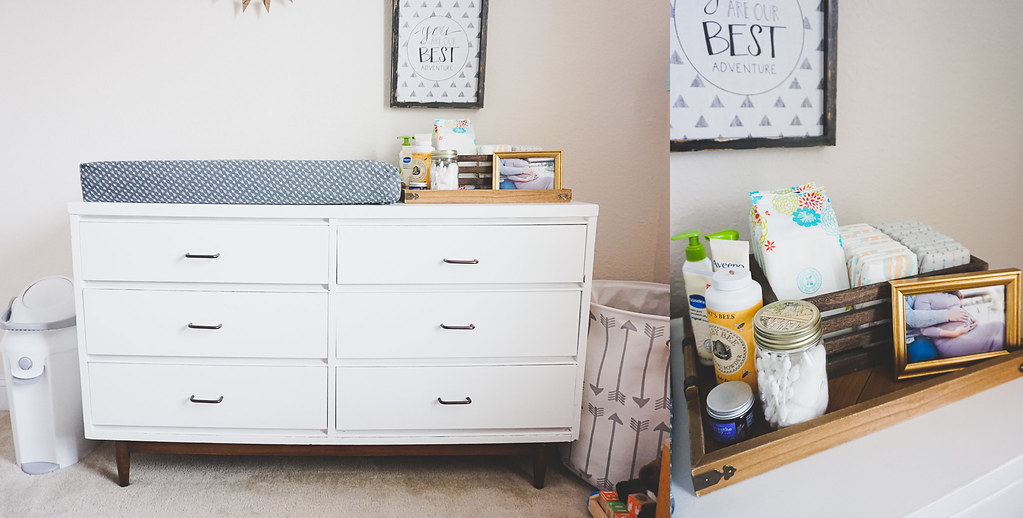
My graphic designer sister, Jane (find her shop here), did most of the framed wall art, so we saved a ton of money from that alone, and then John did the wooden and flag signs. This side of his nursery is definitely the woodlands and outdoorsy part. I love the little details here; from that vintage lantern to the woodland stuffed animals. The dresser/changing station was thrifted and repurposed! I totally scored on that because I was starting to fall in-love with the mid-century type. At first I wasn't sure what I was looking for, but when it popped up on Offer Up! I knew I had to have it! I think it blended perfectly, especially how it matches the crib!

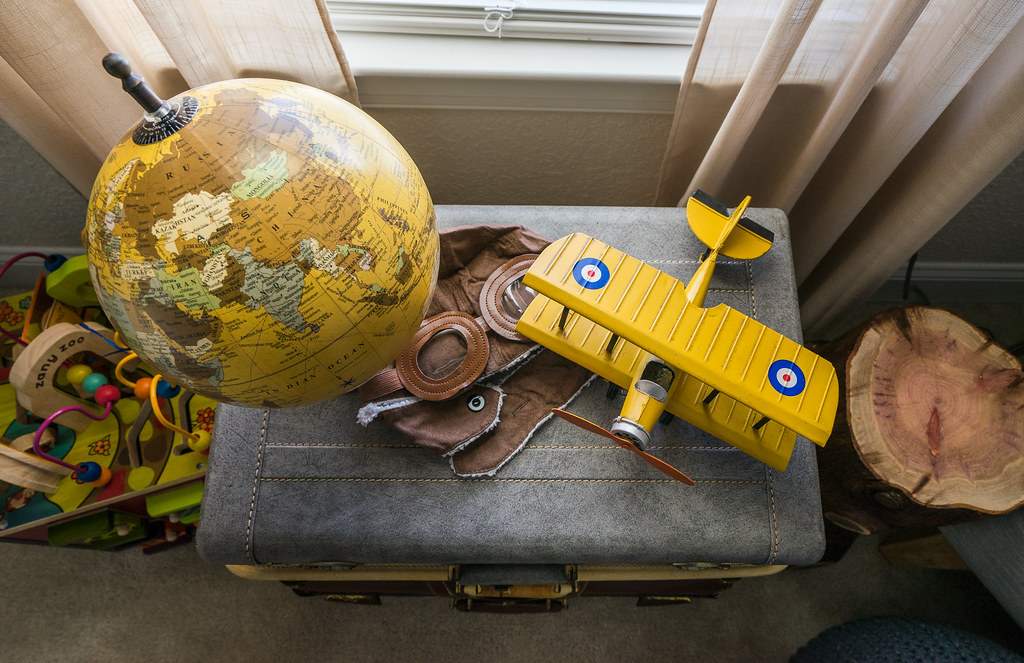
That stump table was the last piece we needed to do to complete the nursery. I was so adamant about having one that I searched high and low to find a place that was giving away or selling stumps. I remember seeing a couple houses with stumps and firewood for sale whenever I drove towards the freeway. Lo and behold, there it was. For 5 days we stopped by this house that had a bunch of them on their yard, no one answered. I was almost going to give up until we finally got a hold of them! I was so excited. It was only $5! John got to sanding it, cleaning and then stained it and tada! The perfect side table! This kind of piece would have cost us $180-$300 everywhere else I looked! The vintage luggages was one of the first things I bought for his nursery. This was a part of the original idea we had, so we stuck with it. Which works out because its his little 'travel' area which holds the vintage plane, pilots hat and goggles and the globe! Told ya everything fell into place at the end! :)
Our main purpose for choosing the theme was to hopefully ignite some interest for travel and adventure within him. That no matter where he ends up in life, he should never stop exploring, in any aspect of his life. We want to teach him that experience is just as important as being well-educated. The world is his playground, and he should play in it. The possibilities are endless, as long as he seeks it and goes after it!
It was definitely a work in progress. I spent a lot of time, late nights even, getting things done for the nursery. Overall, we love how it turned out and is proud of the amazing collaboration we had, cuz despite some of the disagreements, we found ways to compromise and make it work where both of us were happy. Alright, lets be real, Im sure he just let me win most of the time! Haha! I remember sitting there after he put the stump side table and just admired the room. It still felt surreal. Its definitely not as clean now as it is in those pictures, but its still my favorite room in the entire house.
Xx,
Jenn
I have had these sew fun projects done for months, but have not blogged about it! The pictures kind of got lost in all of the galleries and folders from the past several months and I just stumbled upon it last night! Its crazy when I look at them now and how much the nursery has changed since taking these photos!! Anyway, here goes nothing.
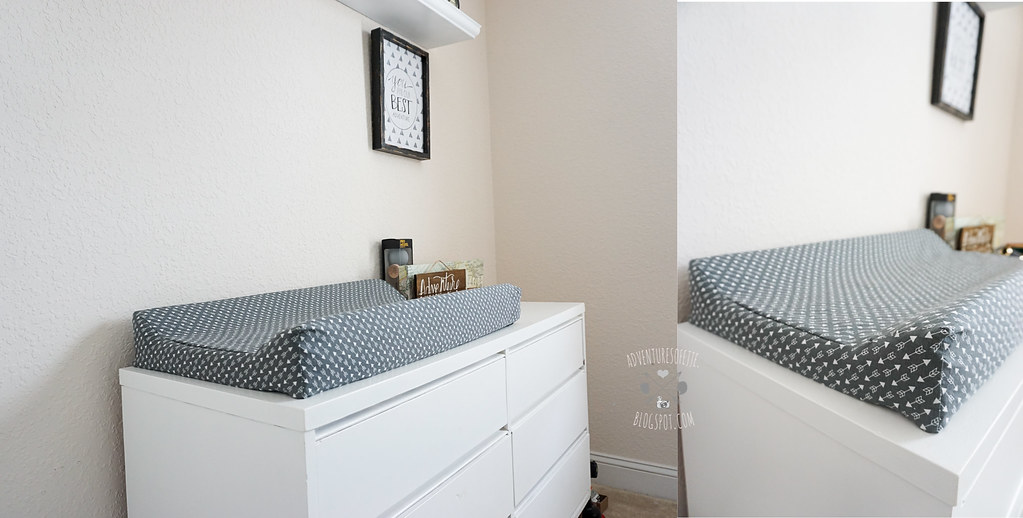
1. Changing Pad Cover -
For those that have followed my blog, you guys would know I did a totally different one months ago. Well a week later I wasn't too in-love with it, so I went out and bought new fabric (on sale of course!). I was so excited when I found this pattern because it was perfect for what we were going for! I also changed up the pattern. I cant remember where I found the original tutorial I followed, but this one is more fitted for the contour pad and actually fits the shape of it. It was a little more complicating than the first one I made, but I love the turn out a lot better! I completed this back in late August!
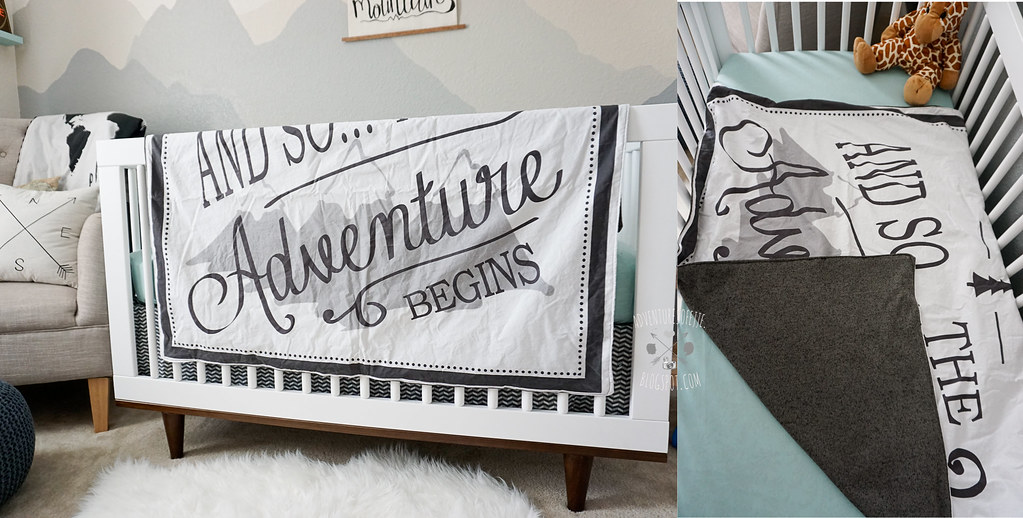
This one was a collaboration. I had asked my sister to come up with the main design for me, we went back and forth for weeks because I couldn't make up my mind! But I am completely happy with the final result! Instead of using a minky fabric for the back side, I ended up going back to Joanns and getting a different fabric for the back because John wanted something grey for this one and I only had a white minky fabric left. Luckily I went ahead and looked for a new one because I found the perfect one for it! Its a soft sweater type fabric, definitely cozy! This will be one of the blankets we bring to the hospital.

The nursery is ninety percent done, but we aren't quite ready to reveal the entire nursery just yet, so I figured I'd share a little drawer and closet organization! This was definitely a work in progress as well, as we were still building his wardrobe and baby item collection! I also wanted to wait to finish it off 'til after the baby-shower to see what we get and didn't get! Oh! & I had to wait for my sister to ship me the other pack of Skubb Drawer Organizer from Ikea. We had gotten one pack the last time we went up north, but with trips being cancelled, we just didnt have time to drive 2-3 hours to Ikea. So I had my sister mail me a pack! Haha! But we have majority of the things he'll need and we'll just buy everything else along the way. Im pretty sure were set for his arrival at this point.
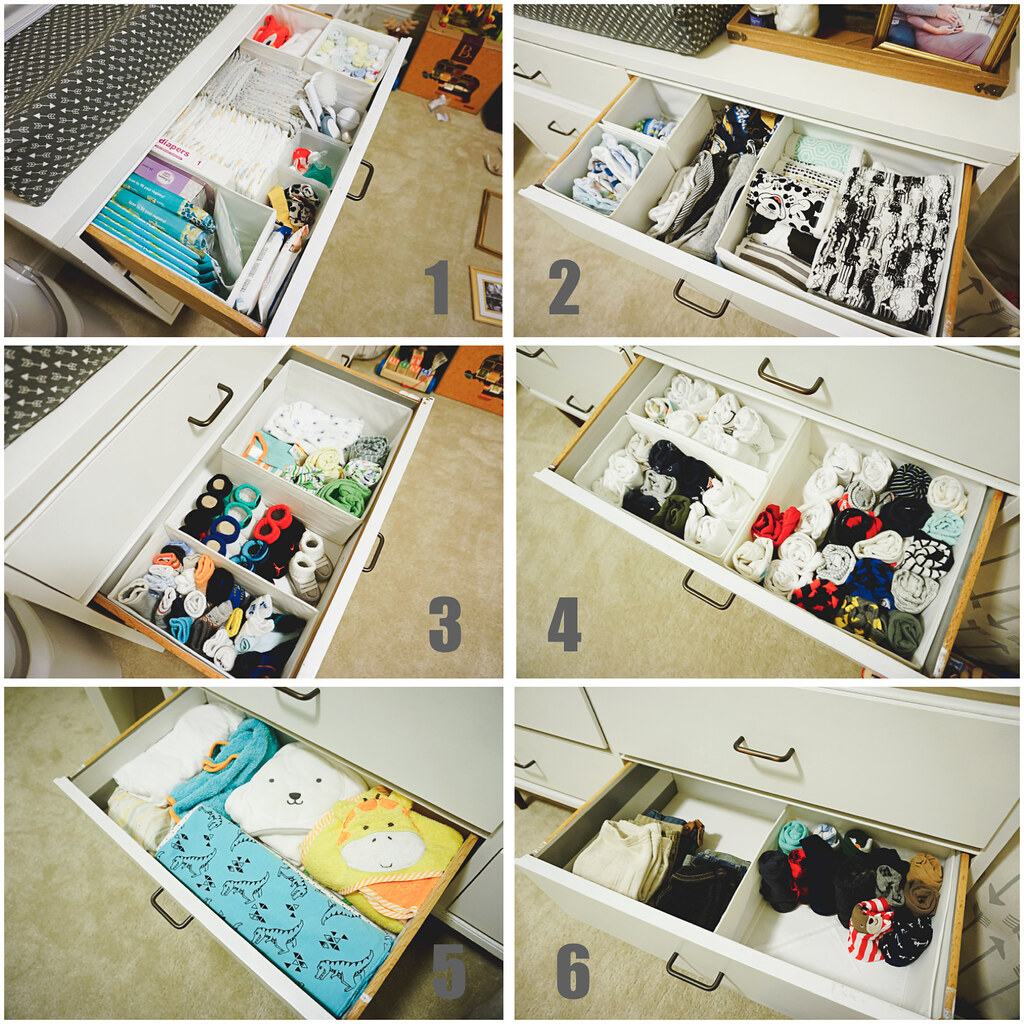
As I've mentioned, we used two packs of the Skubb Drawer Organizers from Ikea to keep his drawers nice and tidy. We'll see how long this'll last when he's actually born! Im an organized freak and can't stand when things are out of whack! John's the opposite though, and if it was up to him, it'd just sit in the drawers without the organizers. Lol! I'll start off with Box 1 and go from there on what is inside the drawers. When I was first organizing I was searching for different ways to do it, but it really depends on the amount of drawers you have and what you think will be an easy access is for you. This was my way of organizing it, of course its not the only way. Just an idea which Im hoping will work for us.
Next to the dresser on the left is a Diaper Champ. We ended up with this one vs the Diaper Genie because there are no special bags for it and we can use any bags, but it still locks away odor. Im sure it wont keep 100% of the odor out, and we plan on throwing the trash out every morning, depending on how full it is. The right side of the dresser is a toy bin, which at this point, is still empty. But I'm sure we will be filling that up as we go!
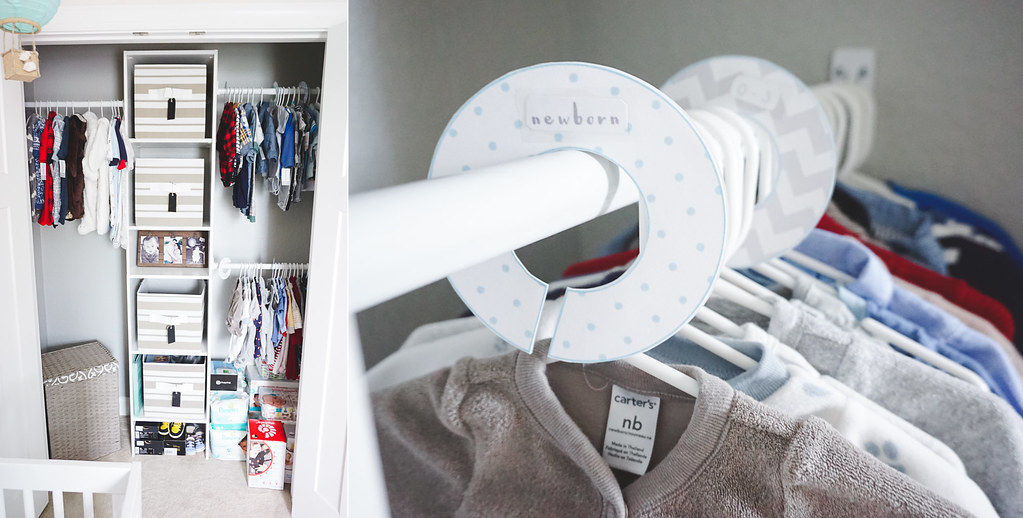
Now to the closet! We had the closet done at week 20 and have just been slowly filling it up. Most of his clothes are gifts from family and friends, and some I buy at second hand stores like Once Upon a Child and Rock-a-bye Baby. Every now and then, I'll head to Carters or Target when they have a good sale and buy some clothes for him. His closet is organized by winter outfits on the left and then by size on the right. I made the size dividers to separate his clothes by sizes, to make it easier to just grab and go. I was going to purchase them at Babies R Us, but after looking at it and the price, I said I'd just make it myself. It was a very simple diy project. The laundry basket is also in the closet, and packs of diapers and wipes! The rest of the baby stuff we received are up in the guest-room because there was no room for them in the nursery.

Ever have trouble finding a nice comfy robe in the print you like that isn't pricey? Not I! I love wearing robes, mainly in the winter time because most of the robes I have are the thick, fleeced ones, which is too hot to wear any other time of the year! Plus, with labor and delivery nearing, I have been on a hunt for a nice comfy robe. Every time I went to the store, all I found were the thick fleece ones, which I have 3 of already, and when I do find the thin soft cotton ones, they don't have my size or its a little pricier than I'd like! So, I got my creative juices going and pulled out one of my robes and a kimono I was thinking of turning into a robe to see if I can imitate it, and went to the fabric store. I went straight to the clearance and sale section because I didn't want to spend too much since I was experimenting and wasn't sure how it was going to turn out yet.
Paisley - Sheer fabric
Purple Long Sleeve - Cotton and Poly blend
Polka Dots - Silk
Paisley - Sheer fabric
Purple Long Sleeve - Cotton and Poly blend
Polka Dots - Silk
Materials Used:
- 1.5 yards of each of the fabric (if you wanna just make a Kimono you can get away with using just 1 yard, but I wanted to be safe than sorry) - Prices Varied
- Rotary Cutter or Scissors
- Measuring Tape
- Cutting Board
- Pins
- Sewing Machine
- Matching Thread
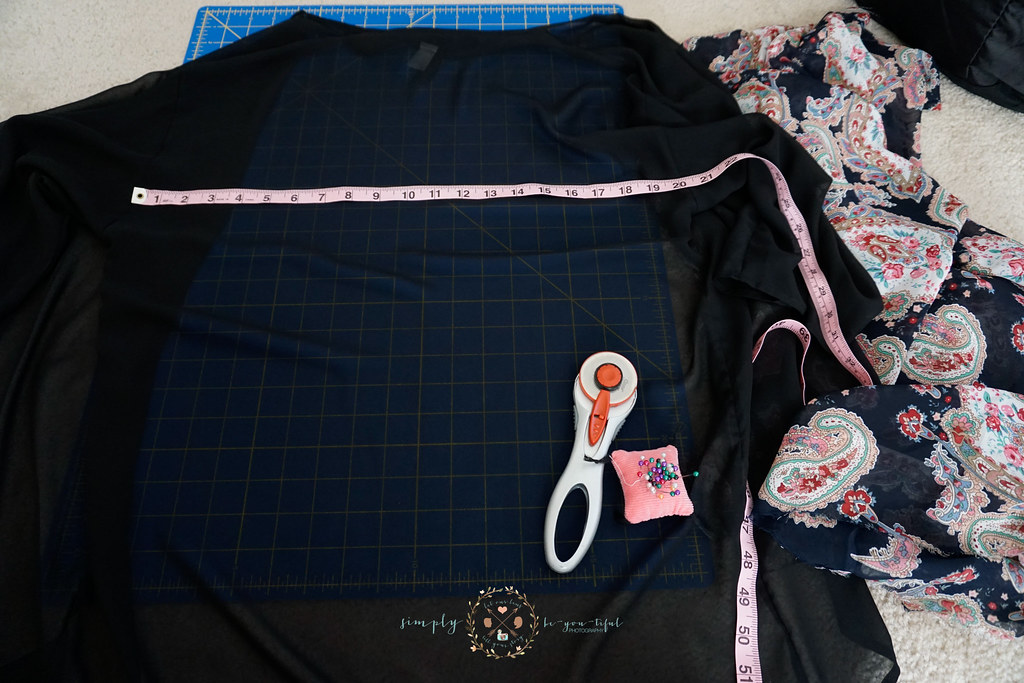

Step 1 (box 1) - I used the measurements that I got from measuring my old Kimono and added a few inches to the width since I have to consider it being wrapped around this big 'ol belly of mine and I just wanted it to bit a little more loose. Measurements I did for the back piece is 27.5 width x 36 in length (since I wanted it to reach my knees). I then cut out two more rectangle pieces, 10in x 26 for the arm pieces and folded it in half, hamburger style.
** Now for the long sleeve it was a little trickier. I can't remember what the exact measurement was because I wanted it skinny towards my wrist area, so I trimmed it at an angle. I know I started off with 17in x 22 in, cuz this one was folded hotdog style. I measured from my shoulders to my wrist and added .5 in because I know I had to hem the end.
Step 2 (box 2): I cut two more rectangles measuring 12in x 36in for the front of my robe (I wanted it even with the back part. But if you're making a Kimono you can change the length to 30in or however the length you want it to be so that the front is shorter). I put the front and arm pieces aside.
Step 3 (box 3): I got the back piece and folded it in half (long ways) and cut a curve on the corners for the neck.
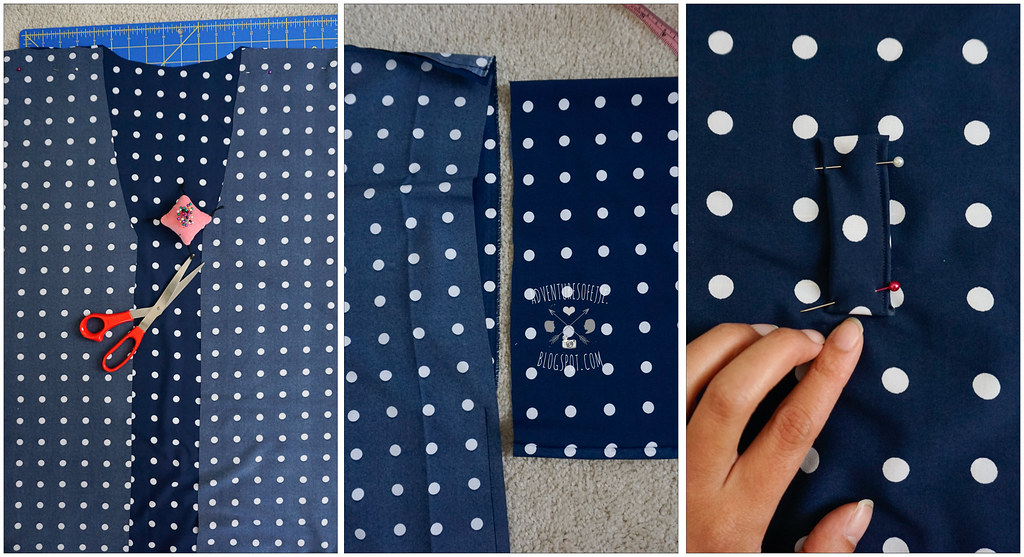
Step 4: I put the front pieces on top of the back piece with the right sides facing each other and then pinned them. At first I looked at and something was off cuz It looked odd, so I cut sort of a V shape from the front pieces so that it wasn't just a straight opening. I started the cut from the armpit area all the way to where the neck line ended (see picture above). Then I got to sewing. I sewed the sides and the top edges where the pins are. When you sew, make sure that you leave an opening for for your sleeves. Mine was a 13 in opening, so that you can slip the sleeves in later.
Step 5: Since I was making a robe, I added a little loop in the back piece of the robe so I can put the straps in. I put it on the center of the back pieces starting just below the armpit part. Make sure its centered. You can also add loops to the sides instead if you prefer it that way, it was just easier to do it in the back so I'd only have to do one. Pin & sew. Now you should have the back, front and loop pieces sewed together and only have the sleeves left to sew.
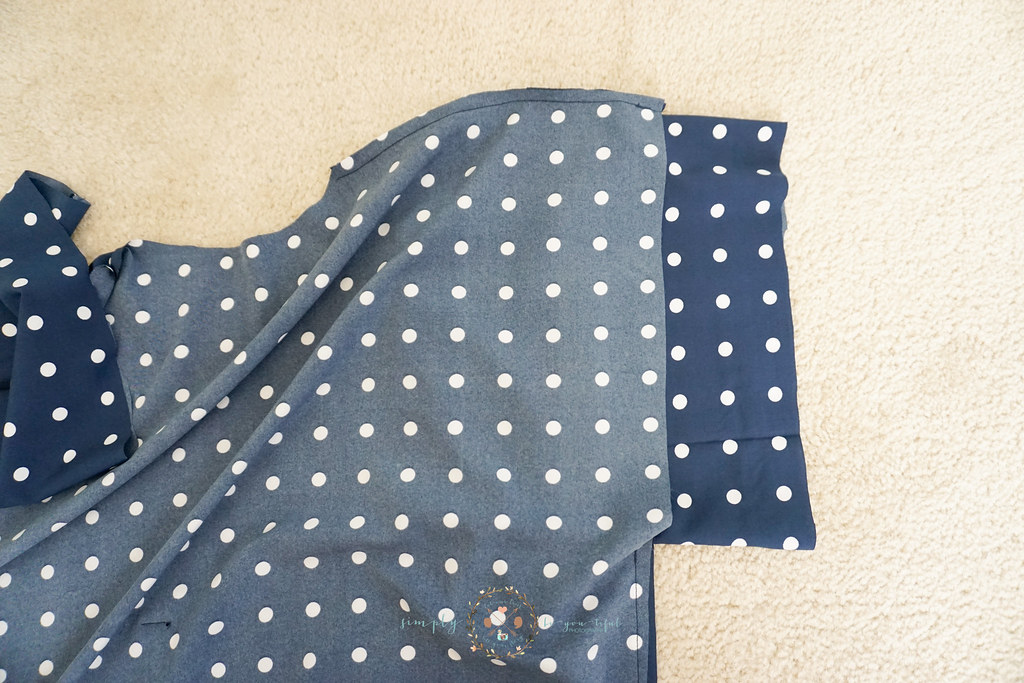
Step 6: Sew the opening edges of the arm pieces together where you folded. Slip the sleeve in the opening and then pin & sew around the edges, do the same for the other side. I had already hemmed the edges of the sleeves prior to finishing this part.
Step 7: Finish the strap by folding it in half (long ways) and do a straight stitch. Tada! All done, you have your self a robe or a kimono! Now I just need to figure out how to add pockets! Ha!
Total Cost for all three: ~ $24.00 (vs. $24 for one from Target).
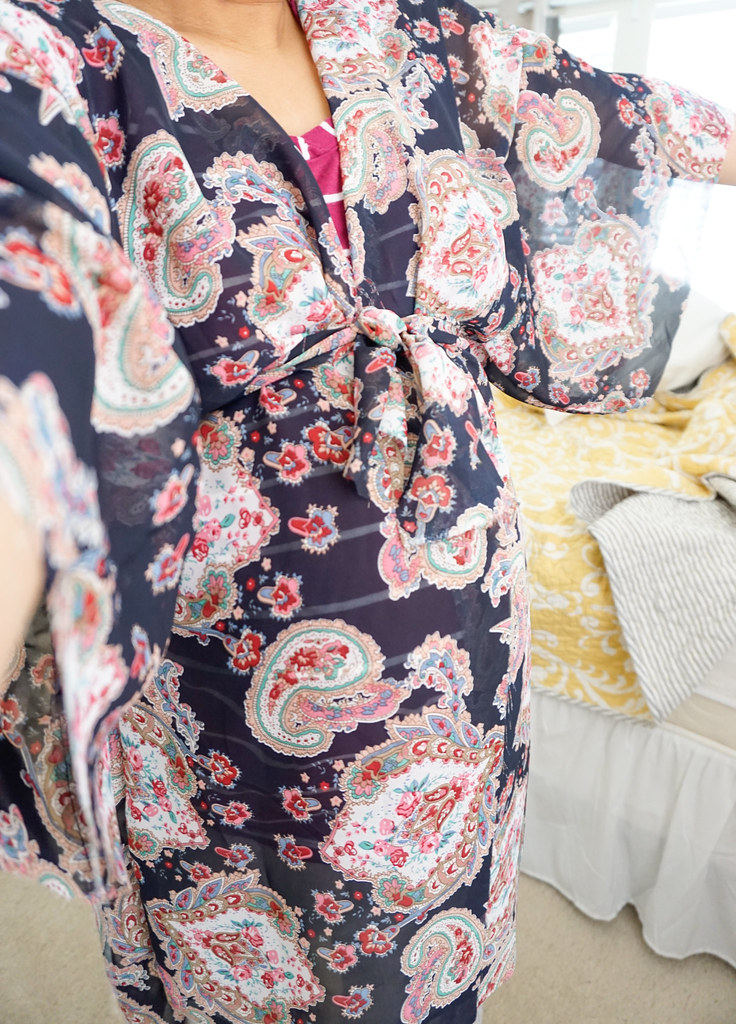
Thats me trying it on after I made it. John wasn't home to take the picture so I had to do a quick selfie! It took me about 4 hours to do all three only because I sat there for a good 30-40 minutes trying to figure out measurements and how I was going to start it and also took a few breaks in between. I started it at around 8:30 and finished just in time for lunch! But it shouldn't take no more than 45 minutes to do or even an hour at the most. I just get distracted easily! Haha! Overall, I love it and was so proud of them when I finished! Im starting to step out of my comfort zone now and actually trying to make apparels. First the dress, now the robes. John is pretty impressed too. He asked me to make him a bathrobe to use for when he gets out of the shower, but the Terry Cloth material for that is pretty expensive and he's taller so Id have to get more yardage. So I said if I cant find him a robe that cost less than $40, i'll make it for him. You should try it, it's pretty easy! :)
Xx,
Jenn
I finished this project two days ago. It took me a couple days to figure this one out! I guess it was meant to be because when I finally figured it out and was ready to buy fabric, the fabric I needed, Knit ITY was 50% off, as well as the other solid stretchy fabric I needed!! Don't ask me how that happens to me often, but call me bargain shopper!
I am no seamstress by any means and just wanted to see what I can come up with! It doesnt hurt to try right? I had ordered two things from a well-known maternity dress retailer during their sales called Sew Trendy Accessories. I love love their gowns! I was able to 'win' 2 items during the sale, and it was chaos! Two of the items i really wanted was sold out before and I wasn't able to get them. I bought the items mainly for our clients use because I love to shoot maternity sessions! But the two items I didn't win, I really wanted to wear for my own maternity session, but it was a 3 week turn around and I wanted to do our session before our baby shower. Anyway, so I looked at the crop top that I had ordered to see how it was sewn. It took me a while to figure out, but I somewhat got the jist of it.. i think!
Materials Used:
2.5 yards of stretch knit (I used ITY) - $9.00 (it was on sale plus I had a coupon)
Matching thread color - $1.5
1" elastic waist band (already had)
Scissors or rotary cutter
Cutting board
Measuring tape
Pins
Sewing Machine
Total: ~ $12.00
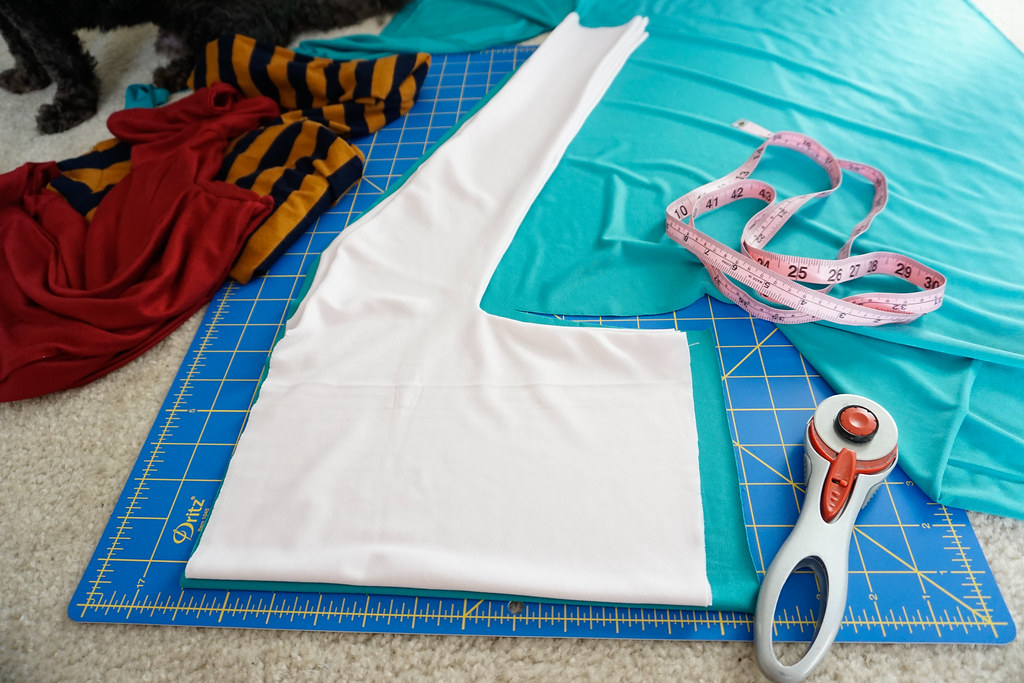
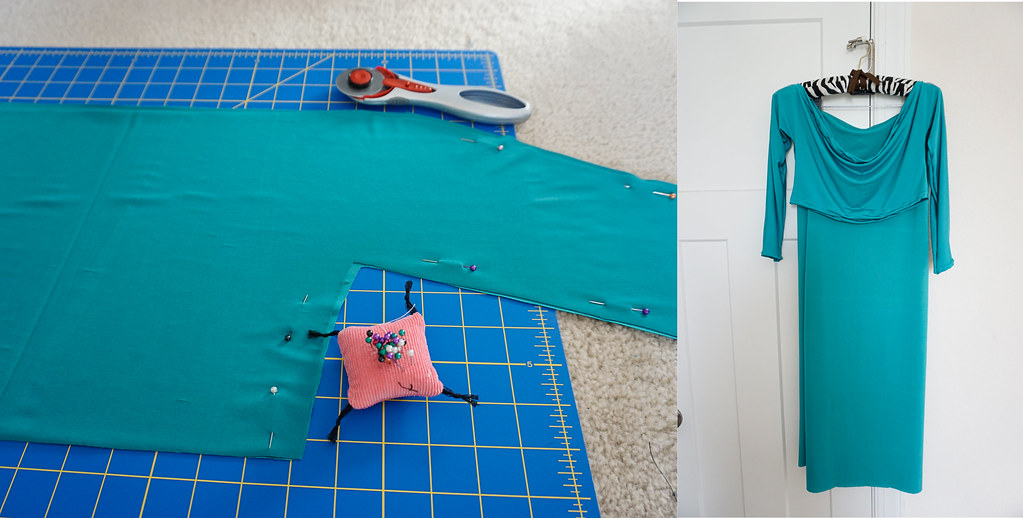
I wanted this to be a two piece item vs, an entire dress so that I can change the top out for future clients. It'll be long sleeve, and short or tube top. Since it's starting to get chilly, I wanted to make a long sleeve but still make it feel sexy, so I made it an off shoulder top. I grabbed one of my old fitted crop tops to use as a pattern and traced it on the fabric. I first did it on a fabric I didn't care too much for just to see how it'd turn out and thats what that white fabric is on top of the jade fabric.
First step: I cut about 24 inches off the 2.5 yards, because the length of the crop top I cut was 11.5 inch and I needed two. You can cut the fabric according to how long you want the crop top to be. Fold the fabric in half and put your pattern on top top to trace. When cutting your pattern make sure you cut at-least an extra .5 inch from the pattern youre tracing for the part you'll be sewing. Since I wanted to make off shoulder, I cut off the neck part straight (using the original fitted crop top shirt I had. It was a turtle neck so I just folded the turtle neck part to where it goes to the shoulders, I hope that make sense!). I cut two pieces of this.

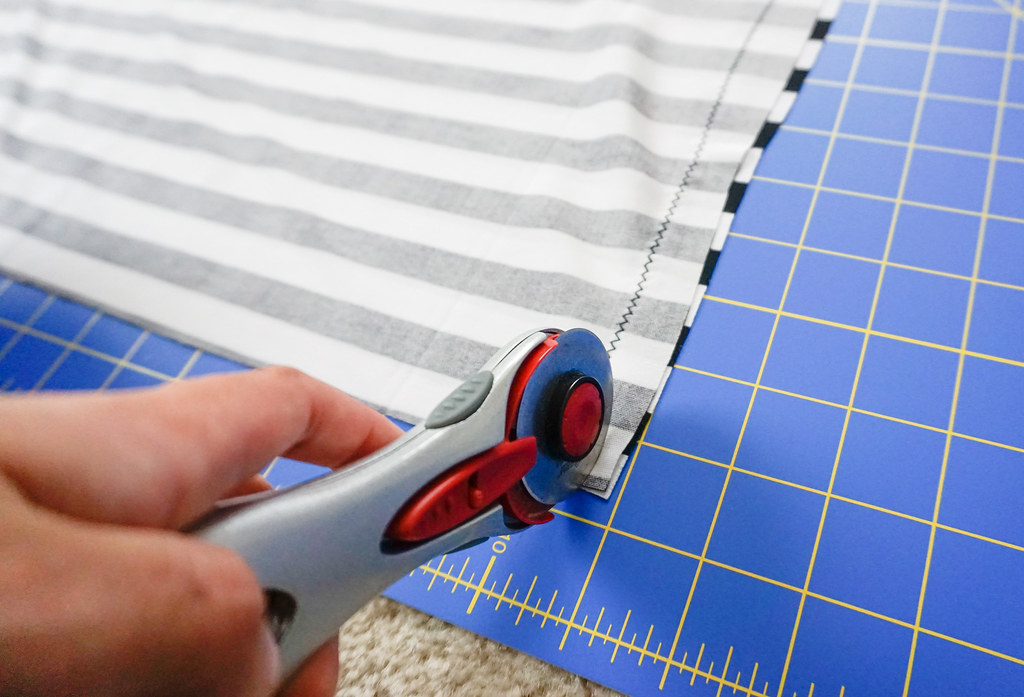
Here goes another sew fun post! I haven't done one in a while! I started this little project over a month ago, but didn't finish the rest 'til recently because I wanted to wait til our carseat arrived so I can see how the fit is on our carseat. This tutorial is for a multi-purpose nursing good. I first saw these on instagram from three different shops. I even added one on of them on our baby registry! But as usual, I wanted to see if I can make it myself, I mean it was just fabric. After looking at many pictures of them, I went to the fabric store and picked out fabric! As soon as I walked in to the store, I saw the black & white stripes, the best part it was in the clearance section! It was 70% off! Steal! It was also the end of the bolt so there was additional discount. I got 60 inches if that for $4! I was so excited. I found two other ones that were also on sale that day, combined with a coupon! I eventually ended up with 6 fabrics (two different trips) totaling to around $15. I got a yard of each fabric. Definitely wait til they have good sales plus a discount for the 'entire' purchase. The type of fabric I used were the stretchy knit ones, because you want them to be able to stretch over the carseat, and it was just lighter and breathable.
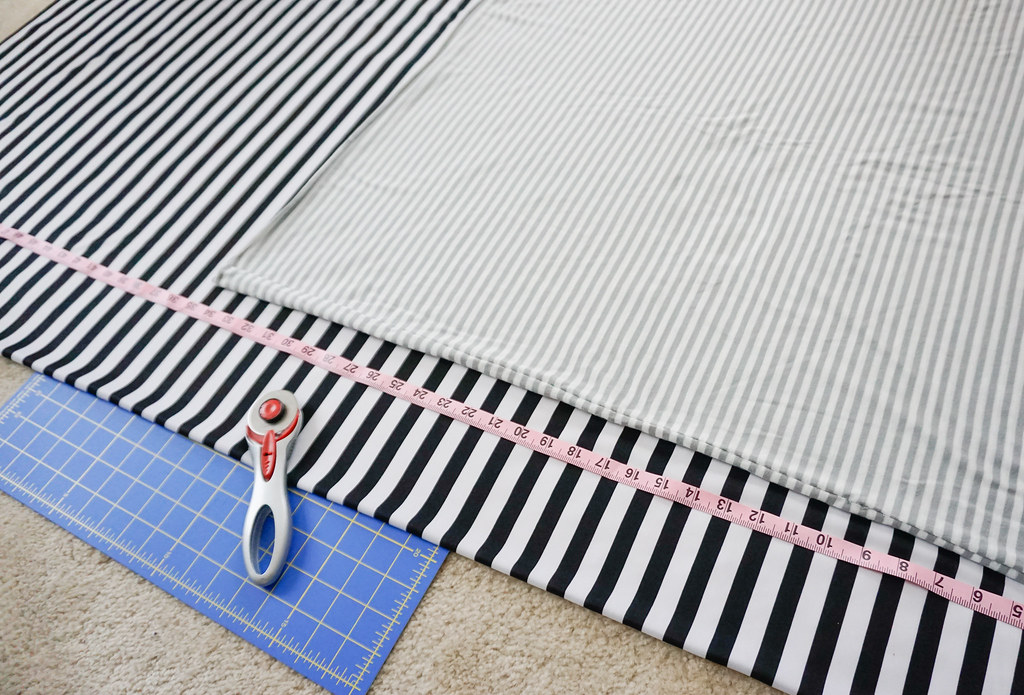
Measure: As I mentioned I've done a few of them before, so I just took the measurements from the one that was already done cuz I now know that it fits the carseat as well. Measurements are 30 x 34, but you can cut them to your liking. I'm probably going to adjust a couple of them so that its a little smaller than this, since they are stretchy anyway. I'm probably going to do a few that are 28 x 30, you just want it big enough so that it covers both the front and back of your when you're breastfeeding.

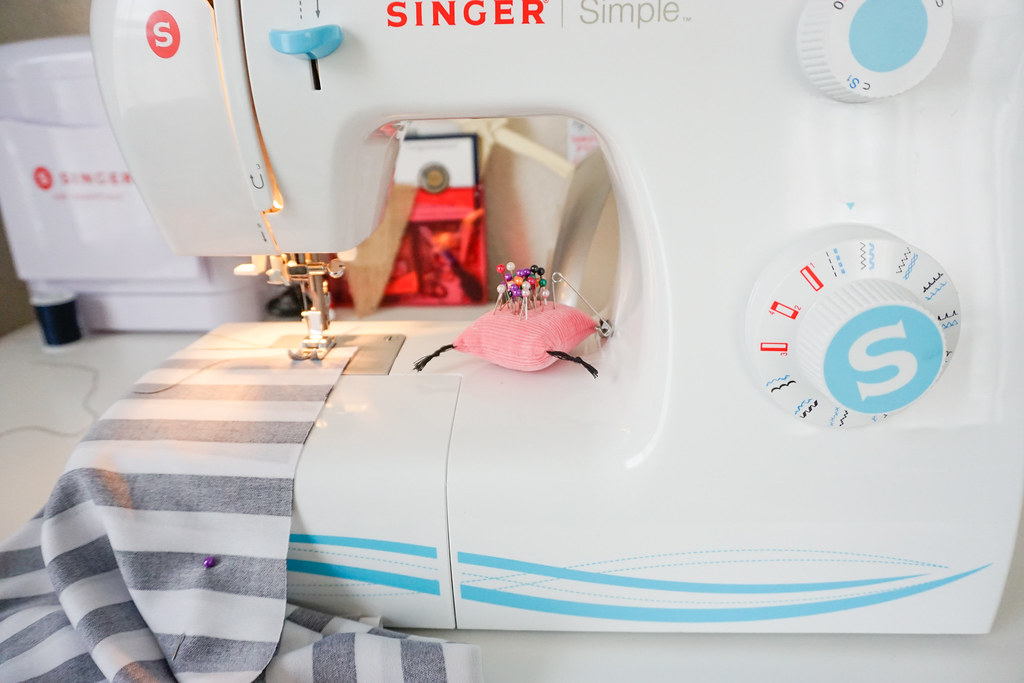
Pin & Sew: After you've cut the fabric to the size of your liking, turn it inside out so that the right sides are facing each other. Fold it in half, pin the edges, and then sew. Depending if you're fabrics stretch in all directions, then thats would be all of you have to do. Now its a little more work if your fabric only stretches in one direction, so make sure you buy fabric that stretches in all directions! I had to do an extra step for this black and white striped ones, and instead of the stripes going horizontal, it went vertical because that was the direction it stretched. I hope that made sense! Ha!
Trim: Once you are done, just trim of the excess and then turn right side up and you're done! It was that easy! Im sure there are other ways to do it, but this is how I figured it out and it worked for me! As long as it helps covers my goodies when Im breast feeding, and also serve as a carseat cover and shopping cart/high chair cover, then I am all good. You can also wear it as an infinity scarf!
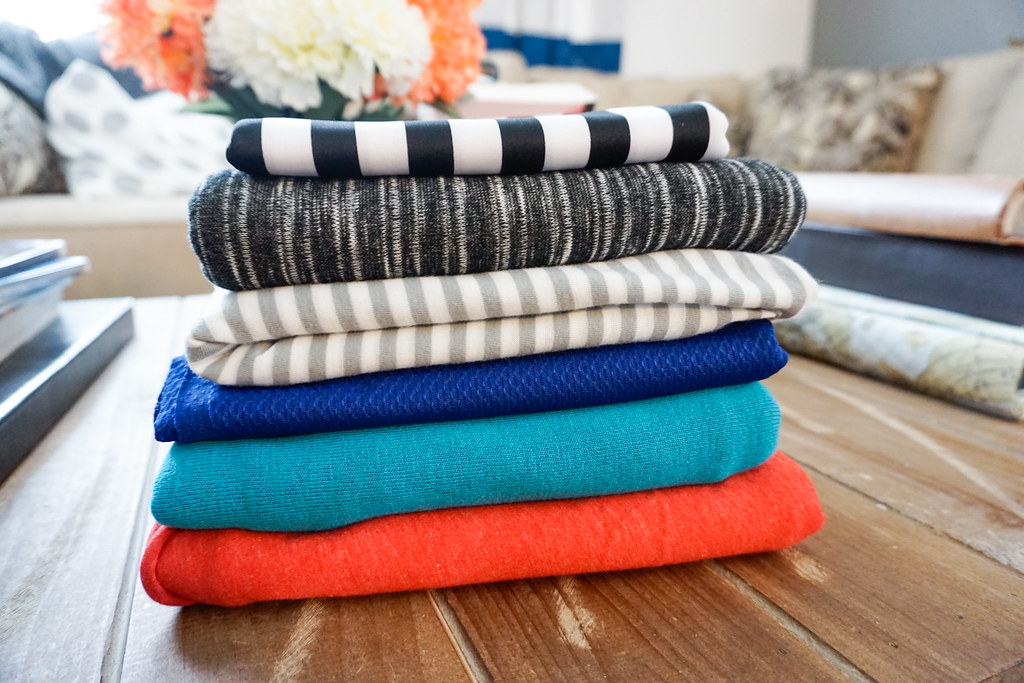
Tada!! I love that I was able to make 6 different ones for $15! I was lucky enough to find the fabrics I wanted from the clearance section or they were on sale the days I went and I was also able to use a discount on top of them! I was also tempted to get a floral one, but since Im having a boy, I wanted to keep it more boy friendly! Maybe I'll add more patterns to this along the way, but these will work for now. Its more than enough actually!
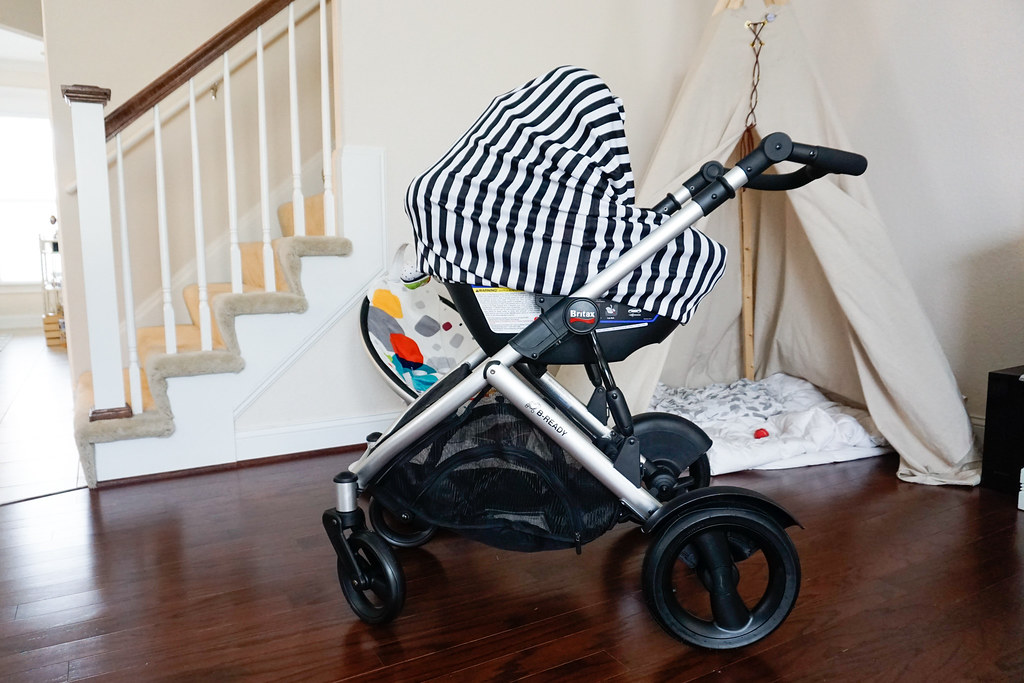
Here it is as a carseat cover! Isn't it so cute? I think it goes really well with our awesome travel system! ;] Hehe! I wish the stripes were horizontal vs. vertical, but thats okay I guess. I've tried on all of them and they all look really good, my other favorite one is the black/grayish knit out, and the gray and white stripes... actually I love all of them on it! John's favorite one is the teal and red. I knew he would thats why I picked out those colors!
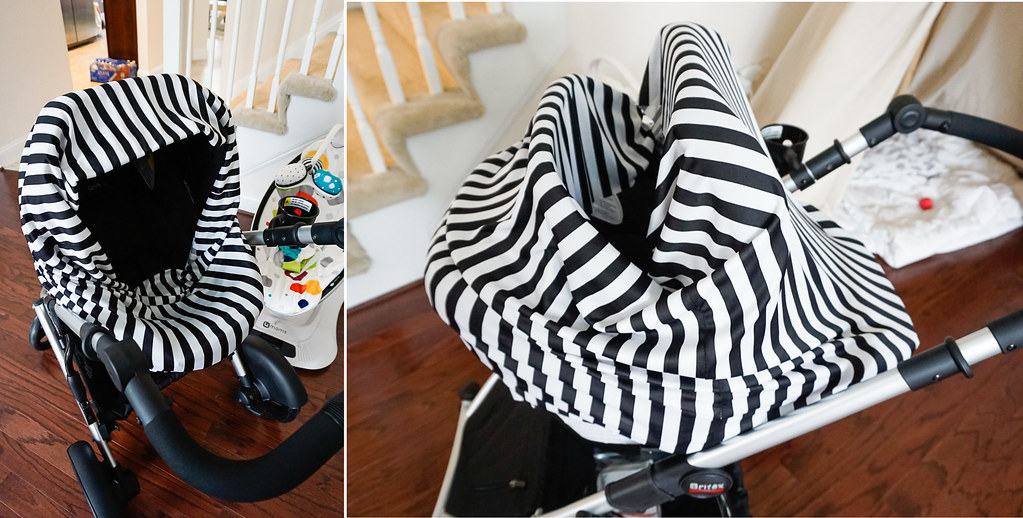
These are the different ways you can put them on your carseat. The one on the right is if you don't want random people trying to touch or look at your baby, its a good way to cover them and still have a little peek hole to check on them. I'll probably have it like this most times when were out in public and then when he's around people we know, have it to the one on the left. Since there's a lot of excess fabric, he can use the excess part as a blanket!!
Materials Used:
- 1 yard of stretch knit fabric (you can cut to the size of your liking later on, better safe than sorry!)
- Rotary cutter or scissors
- Measuring Tape
- Pins
- Sewing Machine
Total cost for all 6: ~$15 (vs. $36-$50 for one!)
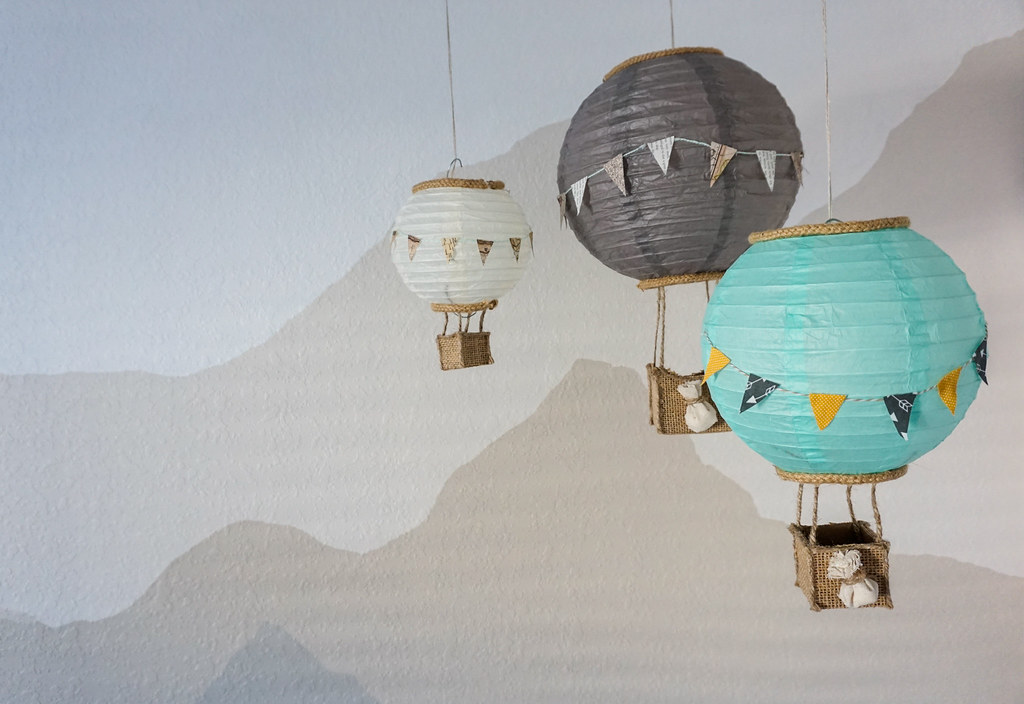
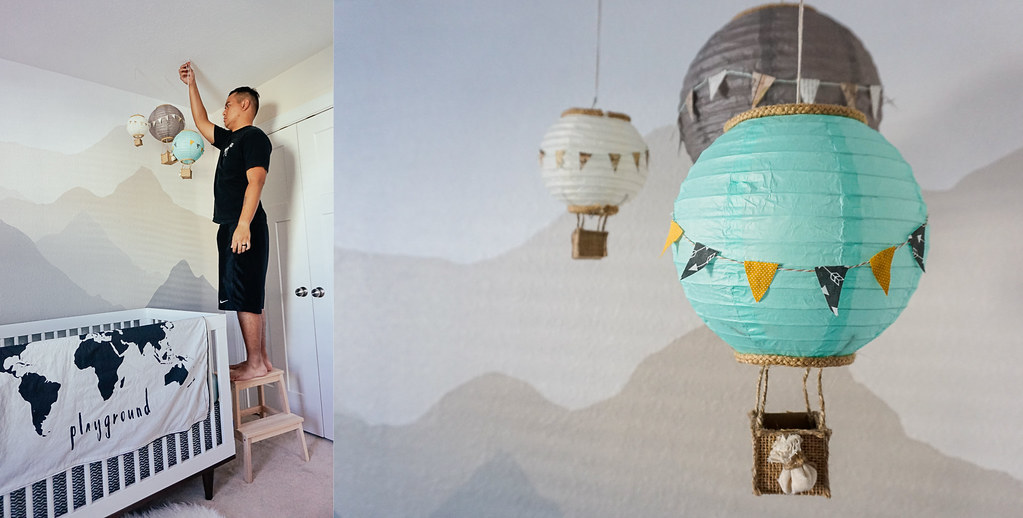
Two decorations were done this week and they were John's projects! When we first started planning for the nursery we agreed that he'd be in charged of the hot air balloons, and he didn't let me down! Of course we collaborated together and he asked for my input, but in the end he got the last say. He originally asked me if we can do fabric and if I can cut up the pieces and pattern, sew it up and stuff it with batting, but I said "lets find something else" because I was already doing a lot and adding that to my list of things to do, we may never get it done! So thankfully, he found a quicker and easier route... paper lanterns! After he told me his plans, I went ahead and ordered some because I could not find the sizes and colors I wanted without it being sold as a pack. Most of the other materials we used I already had, so this was an easy peasy project for him!
I didn't really catch John when he started on it, so I'll try my best to do a step by step tutorial. John's work schedule has been too hectic for me to bother him with posting a blog! He also didn't get the tutorial from Pinterest so there isn't anything for me to link to. But bare with me.
Materials Used:
- Paper Lanterns ( 10", 8" & 6") bought at www.justartifacts.net - Colors: Grey, offwhite, robins egg blue - $9 (with shipping) - I bought 4, because 1 is being used for our baby shower.
- Jute Cord (1 yard) - $2 (with discount) from Hancock Fabrics - used to wrap the top and bottom parts of the paper lanterns
- Bakers twine - for the pennants
- Kraft cardstock used to make the boxes
- Burlap
- Hot glue gun
- Twine cord - to attach the box and lantern
- Cricut Machine - to cut out the triangles in different sizes (you can easily cut them yourselves, this just saved us more time)
- Canvas fabric (left over from another project) - for the baggies
Total Cost: ~$12
Bare with me with the instructions cuz I didn't really work on this:
The firs thing John worked on was the box, he cut up four squares (measurements depends on the size of your lantern), you would want these nicely proportioned to your lantern. He wrapped them in burlap before using the hot glue gun to stick them together. After all three boxes were made, he cut up twine cord to attach the boxes to the lanterns and put them aside so that he can glue the jute cord to the top and bottom of the lanterns. He then attached the boxes and the lanterns together using the twine cord he cut up. My only part in this was making the pennants (which I used the cricut for) using left over vintage map scrapbook paper and a page from an old book. I wanted the blue one to be different so I used left over fabric for that one. I attached it to bakers twine and John put it on the lanterns. I also made the baggies that went on the gray and blue hot-air balloon using left over canvas fabric, and tada, you've got yourself a homemade hot-air balloon decoration!
Sorry if my instructions for these isn't super clear, but as I mentioned it wasn't my project and I wasn't paying attention to John too much while he worked on it! Hot-air balloon decors are so expensive! Some of them range from $50-$250 on Etsy! There was no way we were gonna spend that much for one item! We also didn't want to do a mobile because we didnt want anything on the crib.
_____________________________________________________
- 1/2 yard of Fabric (muslin) - $1.00 at Joanns fabric
- Wood - from Michaels (I forgot what size it is)
- Stain
- Twine Cord
Total Cost: ~$1.50
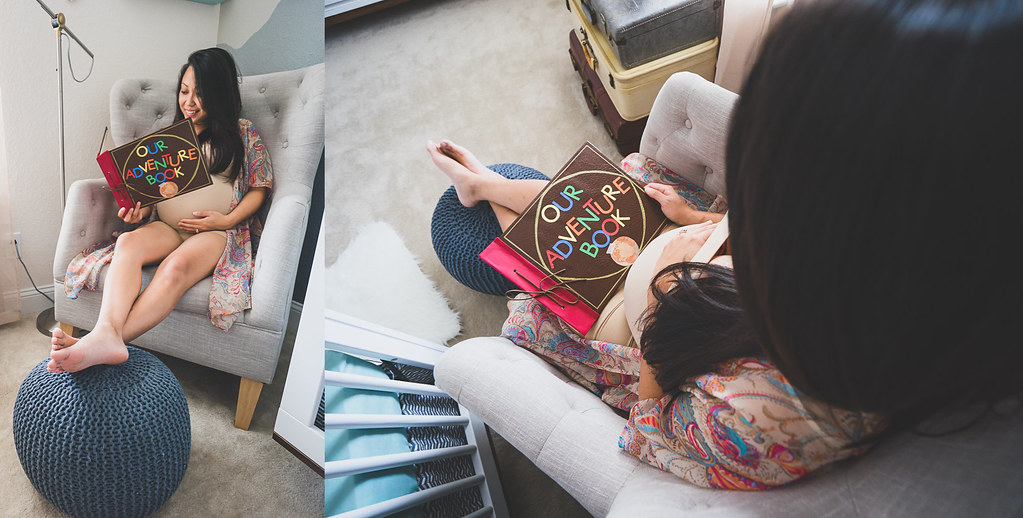
I have been wanting one of these things for a while now! I first saw them on Etsy and was totally tempted to order every single time I saw it! The one I made is a scrapbook type of thing rather than an actual photo albums like they sell on Etsy. They also have these for people who have an UP themed wedding and use it as a guestbook. They run from $40-$75, sometimes more depending on how many pages and the extra knickknacks! I thought it'd be more fun if I made it myself like Ellie did in the movie!!
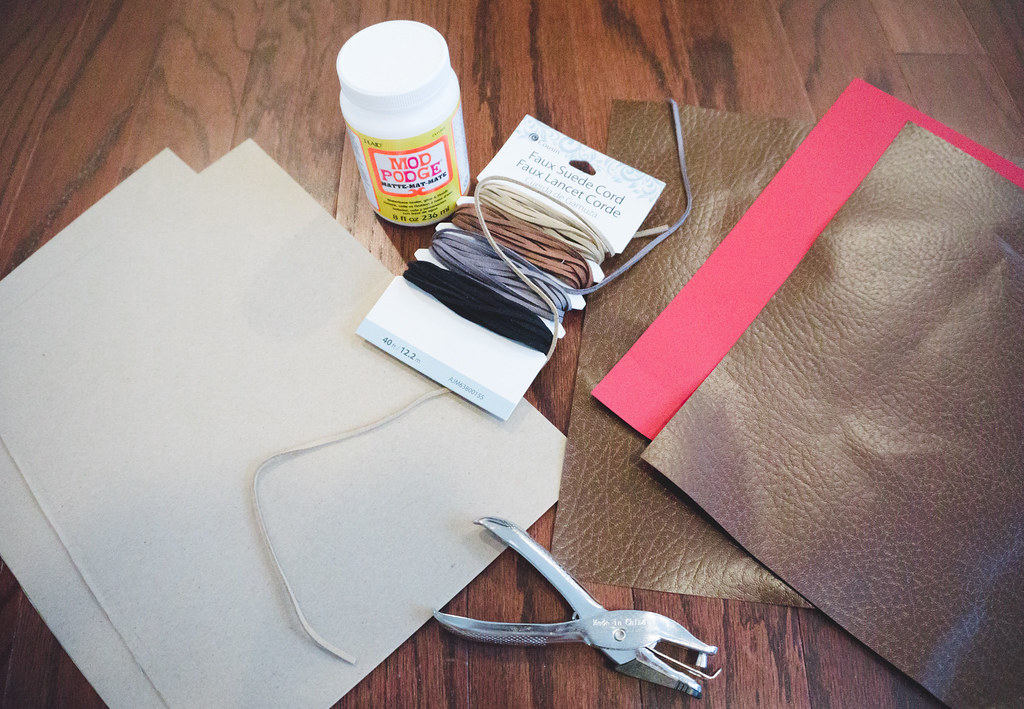
I bought the materials (that I didn't already have) for this project a little over two months ago but just never got around to finishing it because I couldn't find the alphabet stickers I wanted that didn't cost more than $5, but totally kept forgetting that my Mom-in-law gave me a Cricut Expression machine earlier this year! So I finally put it to use and made my own letters! It was pretty simple to make! I found a tutorial on Pinterest that I sort of went off of but changed a few things.
Materials used:
(2) 12 x 12 Chip board from Michaels' scrap-booking isle at $1.99 each (was on sale for 50% off) or you can use a cereal box! I went with the chip board because it was harder and more durable.
(2) 12 x 12 Brown Leather scrapbook paper (for front and back cover) $0.99 each
(1) 12 x 12 Red scrapbook paper (for the binding part of the book) $0.59
(2) 12 x 12 Vintage Map scrapbook paper (you can use whatever you want to line the inside of the front and back cover, I chose the map, in the movie I think she used purple) $0.59 each
Leather or Suede Cord (already had from a previous project)
Whole Puncher (already had)
Mod Podge (already had)
Card Stock to use as the pages inside of the book (left overs from the baby shower invites)
Cricut Machine to cut out the letters
Gold Marker to draw out the square and circle
Globe print out and masking tape for decoration
Total Cost: ~$6.00 || Tutorial found here.

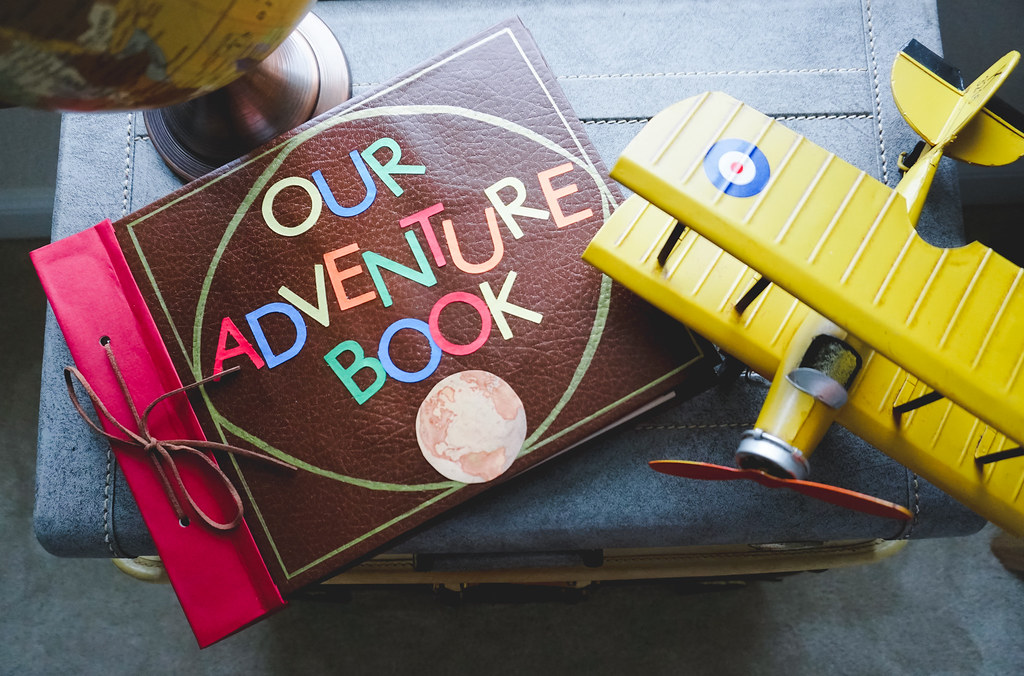
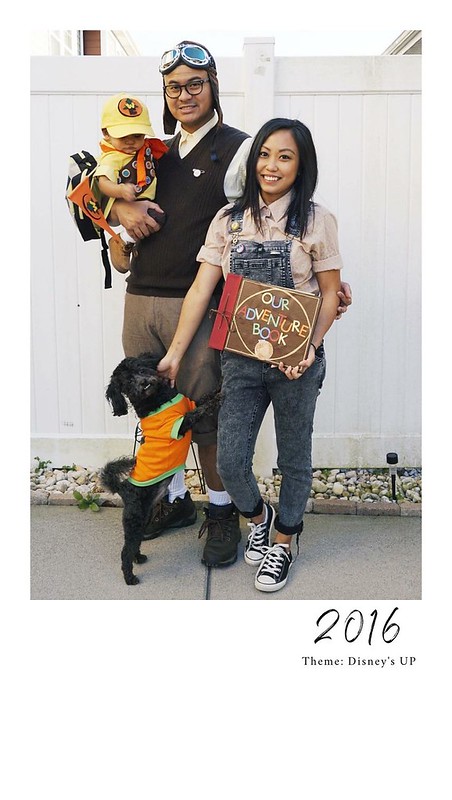
This is the finished product! I finished this diy about two weeks ago but never got a chance to blog about it because I keep forgetting to until John was like "lets do your 28 weeks pictures in the nursery" and I saw it standing on the dresser! As you can see from the picture above, there was no masking tape yet. I just recently added the masking tape because I finally got a piece from work! Lol! I don't know if you can see it in the first picture where I'm holding the book. It just makes it look more legit! Haha! This was a cute little addition to baby H's nursery and I'm glad I finally got around to finishing it! I'll be adding polaroid pictures inside soon enough! :) I was telling John that for next year's halloween we should dress up as Carl and Ellie and baby H can be Russell and Pax can be Dug! I'm gonna make it happen! Lol
Xx,
Jenn
I bought the materials (that I didn't already have) for this project a little over two months ago but just never got around to finishing it because I couldn't find the alphabet stickers I wanted that didn't cost more than $5, but totally kept forgetting that my Mom-in-law gave me a Cricut Expression machine earlier this year! So I finally put it to use and made my own letters! It was pretty simple to make! I found a tutorial on Pinterest that I sort of went off of but changed a few things.
Materials used:
(2) 12 x 12 Chip board from Michaels' scrap-booking isle at $1.99 each (was on sale for 50% off) or you can use a cereal box! I went with the chip board because it was harder and more durable.
(2) 12 x 12 Brown Leather scrapbook paper (for front and back cover) $0.99 each
(1) 12 x 12 Red scrapbook paper (for the binding part of the book) $0.59
(2) 12 x 12 Vintage Map scrapbook paper (you can use whatever you want to line the inside of the front and back cover, I chose the map, in the movie I think she used purple) $0.59 each
Leather or Suede Cord (already had from a previous project)
Whole Puncher (already had)
Mod Podge (already had)
Card Stock to use as the pages inside of the book (left overs from the baby shower invites)
Cricut Machine to cut out the letters
Gold Marker to draw out the square and circle
Globe print out and masking tape for decoration
Total Cost: ~$6.00 || Tutorial found here.

This is the finished product! I finished this diy about two weeks ago but never got a chance to blog about it because I keep forgetting to until John was like "lets do your 28 weeks pictures in the nursery" and I saw it standing on the dresser! As you can see from the picture above, there was no masking tape yet. I just recently added the masking tape because I finally got a piece from work! Lol! I don't know if you can see it in the first picture where I'm holding the book. It just makes it look more legit! Haha! This was a cute little addition to baby H's nursery and I'm glad I finally got around to finishing it! I'll be adding polaroid pictures inside soon enough! :) I was telling John that for next year's halloween we should dress up as Carl and Ellie and baby H can be Russell and Pax can be Dug! I'm gonna make it happen! Lol
Xx,
Jenn
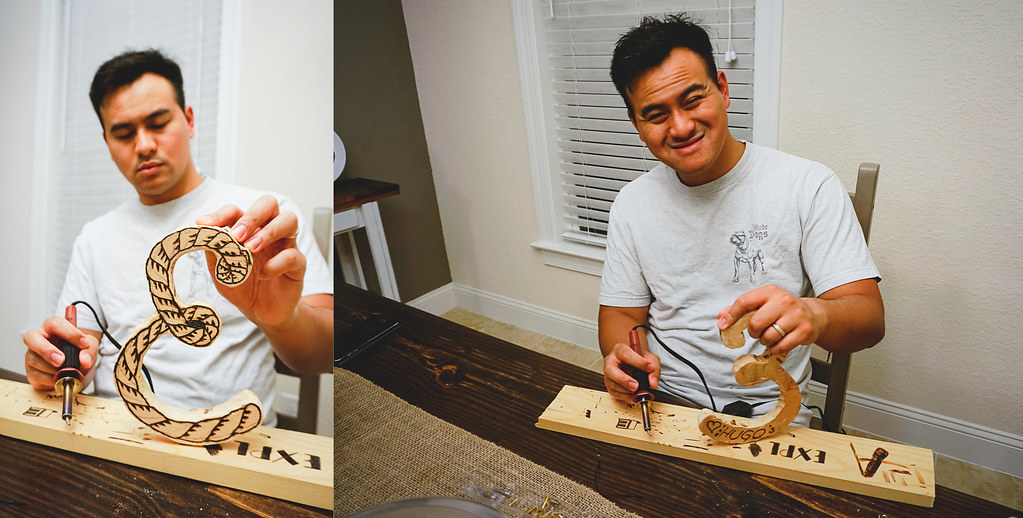
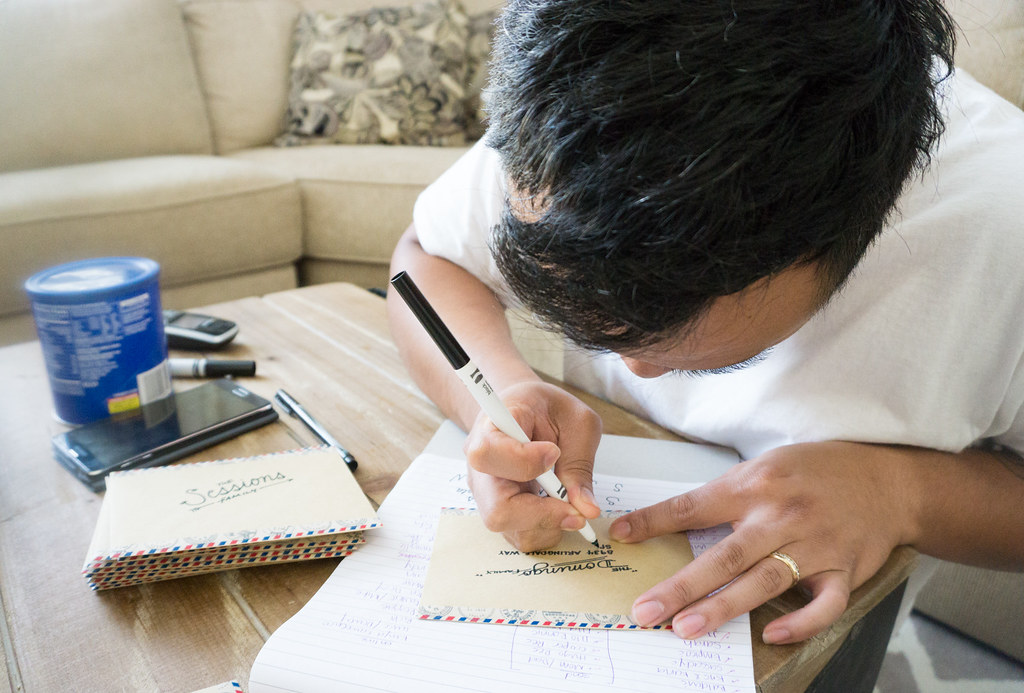
John's been on a roll lately with all these diy's and crafting. Last week he helped me with invitations and this week he finally got around to some wood work. One of his long time buddies at work is also expecting a baby boy in Feb and has asked some of their co-workers to bring in some letters to contribute to the nursery. John picked the letter 'E' because all the other letters he wanted was taken. He said he wanted something different and not any from Michaels or whatever craft store because he knew thats where most people were gonna go. So what does he do? Makes his own letter of course! I wasnt really paying attention to him cuz I was doing something else and would just sneak in on him every now and then to check his progress. I know he started with one of the many scrap woods we have in the garage and sketched out the letter E before cutting it out! I was wondering what he was doing in the garage! Then he finally put to use the wood burner/carver that I bought him a few months ago to do the drawing of the rope to give it that rustic/nautical vibe. The couple has chosen a nautical theme for their boy's nursery, so I think this would be perfect!
Materials Used:
Scrap wood that we had (1 x 6, I believe is the size he used)
Dremmel Wood Kit to cut out the letter E, not sure which tip he used to cut it out.
Versatool Wood Burner/Carver (can be bought from any crafts store)
Total Cost: Free
Materials Used:
Scrap wood that we had (1 x 6, I believe is the size he used)
Dremmel Wood Kit to cut out the letter E, not sure which tip he used to cut it out.
Versatool Wood Burner/Carver (can be bought from any crafts store)
Total Cost: Free
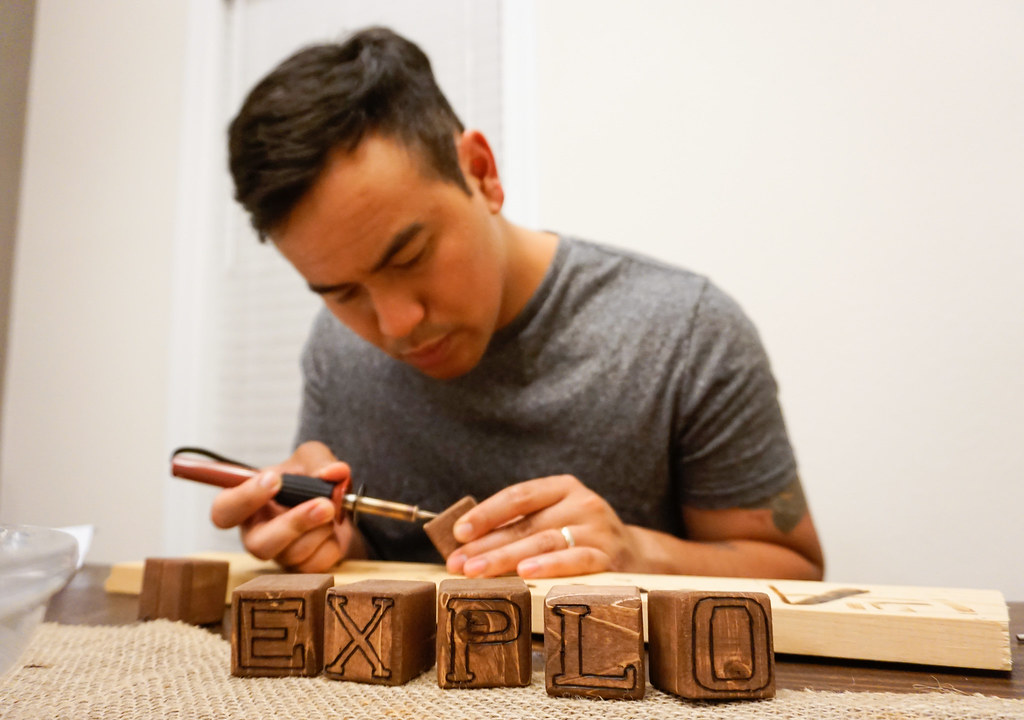
A few days later, he worked on the blocks that he cut up from scrap wood a few weeks ago. I finally stained it! I originally wanted baby H's name on it but I changed my mind and asked him to do 'explore' instead. I think Im gonna put his name somewhere else. I tease him about opening up our own shop and sell all of these things we've been making for the nursery! But keeping up with shop inventory would be a pain, so nah! With photography, me working part-time, his work schedules and a baby on the way.. I think we have our hands full already. Plus he plans on going back to school in the next few months so keeping up with a shop would be too much to add to our agenda!
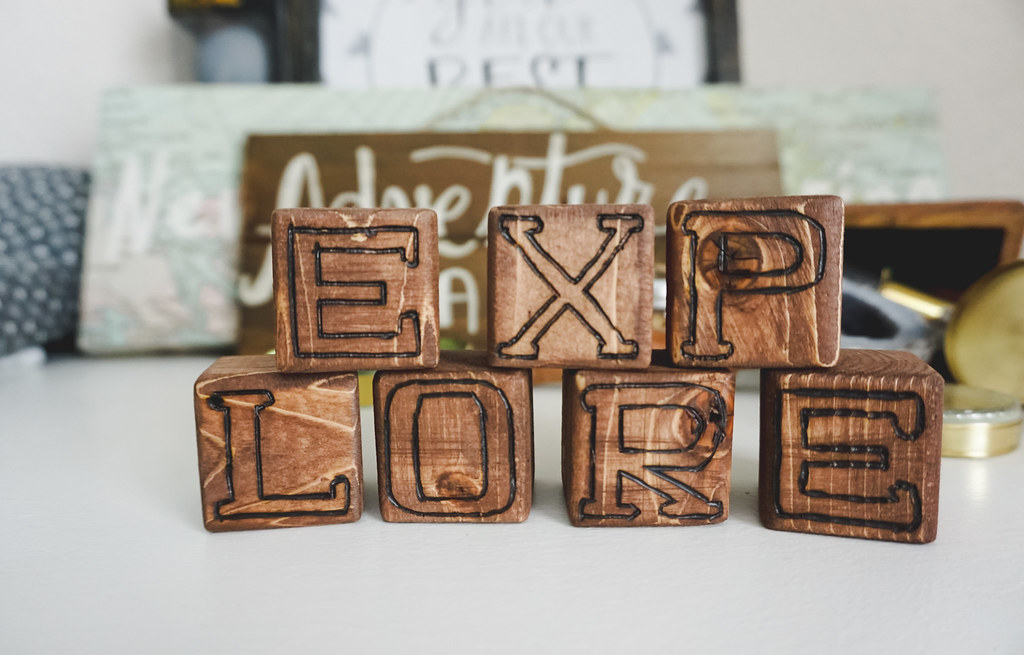
It turned out pretty neat!! I love how the original wood is exposed through the stain. I didnt do that intentionally, I was trying to get it stained quick so that I dont spend too much time inhaling the smell! It took me about 5 minutes to stain all 7 blocks. I like how it turned out anyway! It is now displayed on the shelf! I'm gonna have him work on more blocks for another project! Its for something i'll need for when the baby is born! ;]
Materials Used:
2 x 2 wood (from scrap wood we have in the garage) cut into blocks
Saw
Rustoleum Stain - Carrington (left over from another project)
Versatool Wood burner/carver
Total Cost: Free
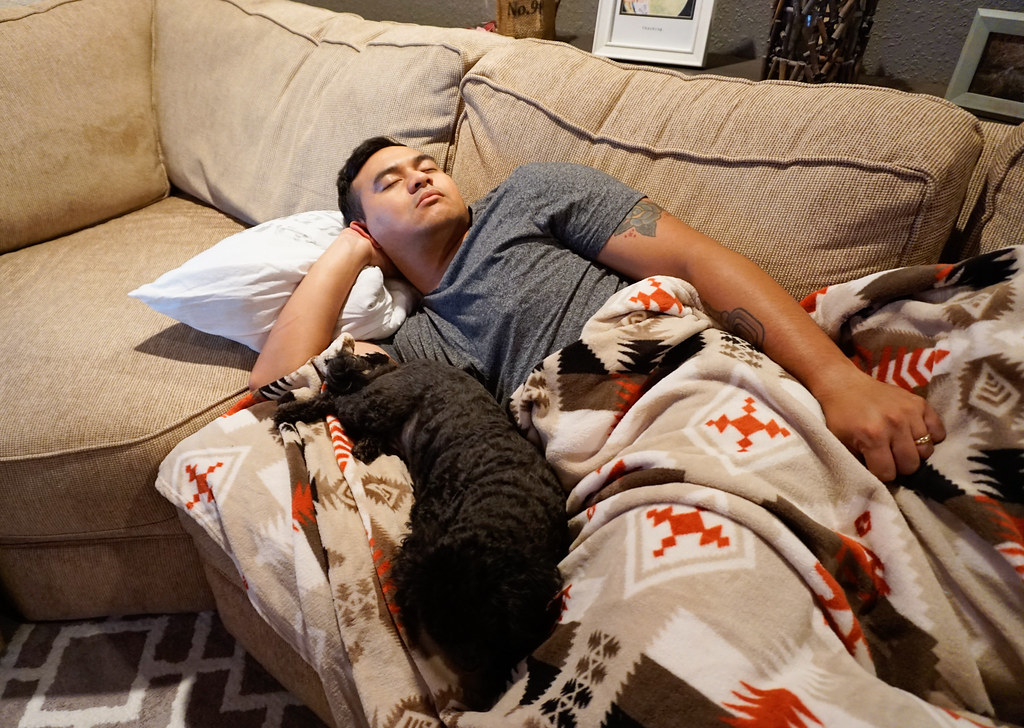
I love when I catch them sleeping and cuddle on the couch! If they aren't on me, they're cuddle up next to each other! We say that Pax likes to cuddle with me during the day and come night time, he loves cuddling with Dada. I love these two and soon I get to add one more boy to this picture! I cant wait!!
Xx,
Jenn
Materials Used:
2 x 2 wood (from scrap wood we have in the garage) cut into blocks
Saw
Rustoleum Stain - Carrington (left over from another project)
Versatool Wood burner/carver
Total Cost: Free
I love when I catch them sleeping and cuddle on the couch! If they aren't on me, they're cuddle up next to each other! We say that Pax likes to cuddle with me during the day and come night time, he loves cuddling with Dada. I love these two and soon I get to add one more boy to this picture! I cant wait!!
Xx,
Jenn
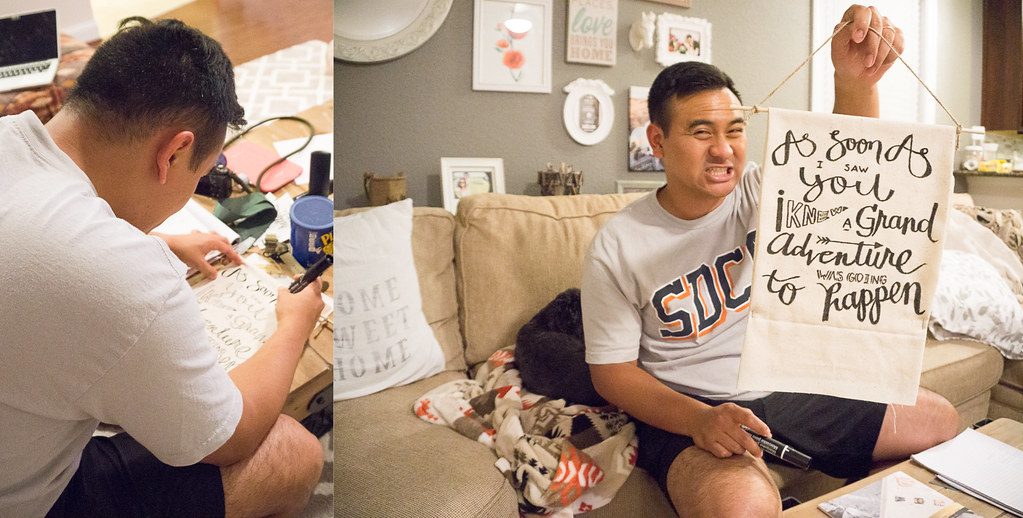
John finally got started on the banner I wanted him to do. We all know that when it comes to writing or wannabe calligraphy, I am at level 0. Haha! I wasn't sure what quote I wanted so I had him choose between several and he chose this. This quote was part of our pregnancy announcement, so I guess it worked out! He sketched different designs before going with this one. He didn't love it, but I did! After he was done, I let the fabric marker dry over night before finishing it off. I ended up cutting the ends into an upside down triangle before sewing it up. This was one of the quickest diy's we did and is just one of out two banners he'll be making for the nursery. :)
Materials Used:
1/3 yard of Muslin fabric - the canvas ones
Fabric Marker
Wooden sticks (i forgot what they were called)
Twine rope
Total Cost: $1.00 (for the fabric), everything else we had from previous projects
Materials Used:
1/3 yard of Muslin fabric - the canvas ones
Fabric Marker
Wooden sticks (i forgot what they were called)
Twine rope
Total Cost: $1.00 (for the fabric), everything else we had from previous projects
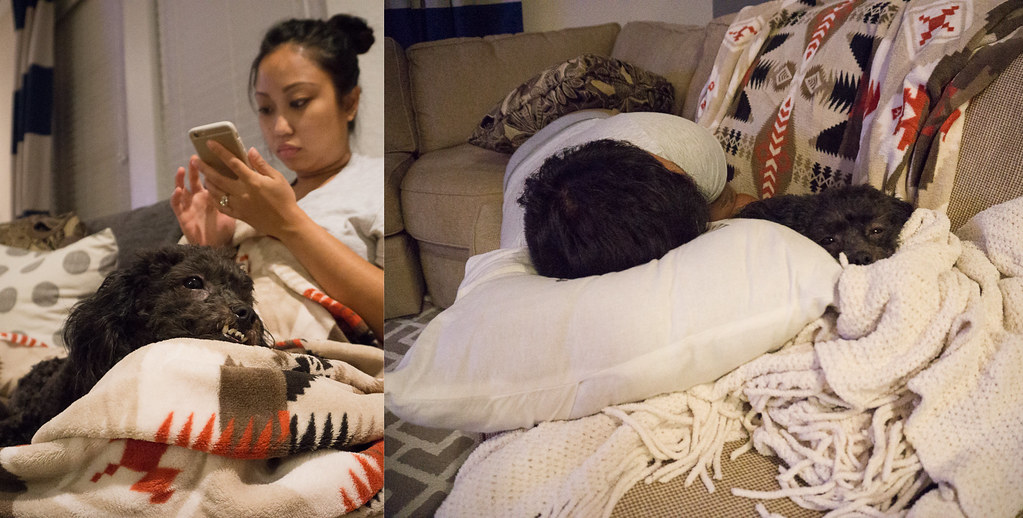
I gotta give Pax the furbaby some blog lovin! He has been very protective of me lately and has been loving to cuddle his baby bro. I mean he used to do it before but he does it all the time now without me having to call him over. He's also loving the new tribal blanket that John bought. We have so much throws on the cough that each one of us has our own! I've also been catching John and Pax snuggling in the cutest ways on the couch lately, usually after we do projects or get chores done. When baby H comes, we're still going to make sure that Pax gets as much loving as he needs. We said we'd take turns playing with him. If I had the baby John would be incharge of giving Pax attention and vice versa. He's our first bubs, and nothing is going to change, we're just adding another member to our family! :)
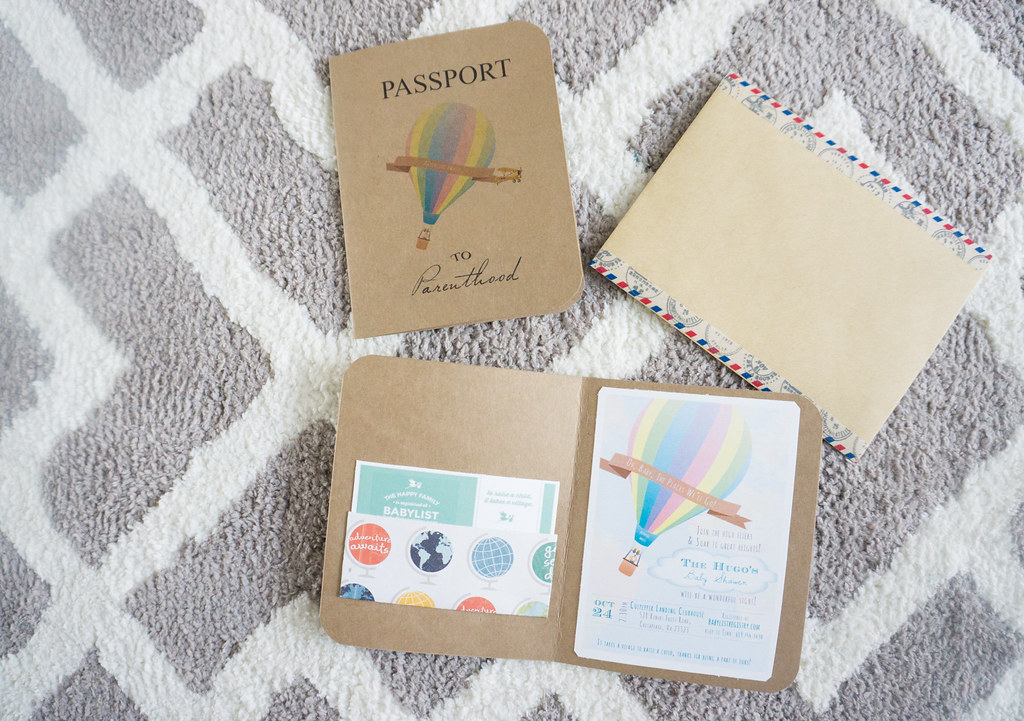
Journey to Parenthood
DIY: Our 'Passport to Parenthood' baby shower invitations!
Thursday, September 24, 2015